To bake a pie shell, fit the dough into a pie plate, chill it, line it with parchment, and add pie weights. Bake at 375°F until the edges set, then remove the weights and bake until the base looks dry. For a fully baked shell, continue until the bottom is golden.
In American home kitchens, a baked pie shell is the base for many classic desserts, from pumpkin and pecan pie to lemon meringue and chocolate cream pie. It also works for savory dishes such as quiche. The right baking method depends on what goes into the shell next. A crust that will bake again with its filling usually needs only a partial bake, while a shell for a chilled filling often needs to bake until fully cooked.
The key is to keep the dough cold before it enters the oven and hold it in place as it heats. Pie weights help stop the base from puffing up and the sides from slipping down. Once you know when to remove the weights and how to judge the crust by sight, it becomes much easier to prepare a shell that is crisp, evenly baked, and ready for filling.
Baking a pie shell means cooking the pastry in its pie plate before, or sometimes without, its final filling. The method is often called blind baking. It gives the crust a head start and helps prevent a soggy base when the filling contains a lot of moisture.
There are two main methods. Par-baking means the shell is only partly cooked before the filling goes in. Full blind baking means the crust is baked until the base is cooked and usually golden, so it can hold a filling that does not need to bake in the oven.
These methods are related, but they are not interchangeable in every recipe. A custard pie that needs to bake for a long time may need a partially baked crust, while a no-bake chocolate cream pie needs a fully baked shell that can cool before filling.
Source: sallysbakingaddiction.com
Par-baked shell
Use this when the pie will return to the oven with its filling. The crust should be set and partly baked, but it does not always need a deep golden color.
Bake the shell first when the filling is wet, the filling needs little or no baking, or the recipe calls for a crisp crust. Cream pies, fresh fruit pies with prepared fillings, and some quiches can benefit from a prebaked base, although the exact method depends on the recipe.
A double-crust apple pie usually does not need a blind-baked bottom crust unless the recipe specifically directs you to use one. Baking both the crust and filling together is part of how that pie is meant to cook.
Check the filling method
Follow the recipe if it gives a specific instruction for an unbaked, par-baked, or fully baked shell.
Ingredients and Tools You Need
You need a pie crust, a pie plate, parchment paper, and something to weigh down the dough. Homemade pastry and store-bought pie dough can both work. The main difference is that homemade dough may need more attention to chilling and rolling, while packaged dough may have its own baking instructions.
A standard 9-inch pie plate is common in US recipes, but use the size specified by your recipe. A smaller or deeper plate can change how the dough fits and how long the shell takes to bake. Glass, metal, and ceramic plates also heat differently, so the times below are starting points rather than guarantees.
Pie weights are designed to hold pastry down during the first stage of baking. If you do not own them, dry beans or uncooked rice can serve as reusable weights for this purpose. Keep them in a labeled container after use and do not cook them as a normal side dish afterward.
Source: mycountrytable.com
Pie dough
Use homemade or refrigerated dough intended for a pie crust. Let frozen dough thaw as directed by the package or recipe.
Pie plate
Choose the size and material specified in the recipe whenever possible.
Parchment paper
Use a piece large enough to cover the base and reach up the sides without leaving gaps.
Pie weights
Ceramic weights, dry beans, or uncooked rice can help prevent bubbles and side collapse.
Fork and oven mitts
A fork may be used to dock the dough when the method calls for it. Oven mitts help you handle the hot plate and parchment safely.
Can You Bake a Pie Shell Without Pie Weights?
Yes, but the result can be less predictable. Weights help support the sides while the fat in the dough melts and the pastry begins to set. Without them, the bottom may puff up and the sides may slide toward the center.
If you have no weights, chill the shell well and use a recipe designed for that method. Some crusts can be docked with a fork and baked without weights, but holes may let liquid filling seep through later. Do not assume this method suits every pastry or filling.
Use a suitable substitute
Dry beans or uncooked rice can weigh down the parchment in the same basic way as dedicated pie weights.
How to Bake a Pie Shell Step by Step
For most standard pie doughs, a 375°F oven is a useful starting point for blind baking. Some recipes call for a hotter or cooler oven, so follow the instructions for your particular crust when they differ. The timing also depends on the plate, dough thickness, and whether you want a partial or full bake.
Plan for about 15 to 20 minutes with the weights in place, followed by another 5 to 15 minutes after removing them. These are broad working ranges, not fixed baking times. Start checking early and rely on the crust’s appearance as well as the clock.
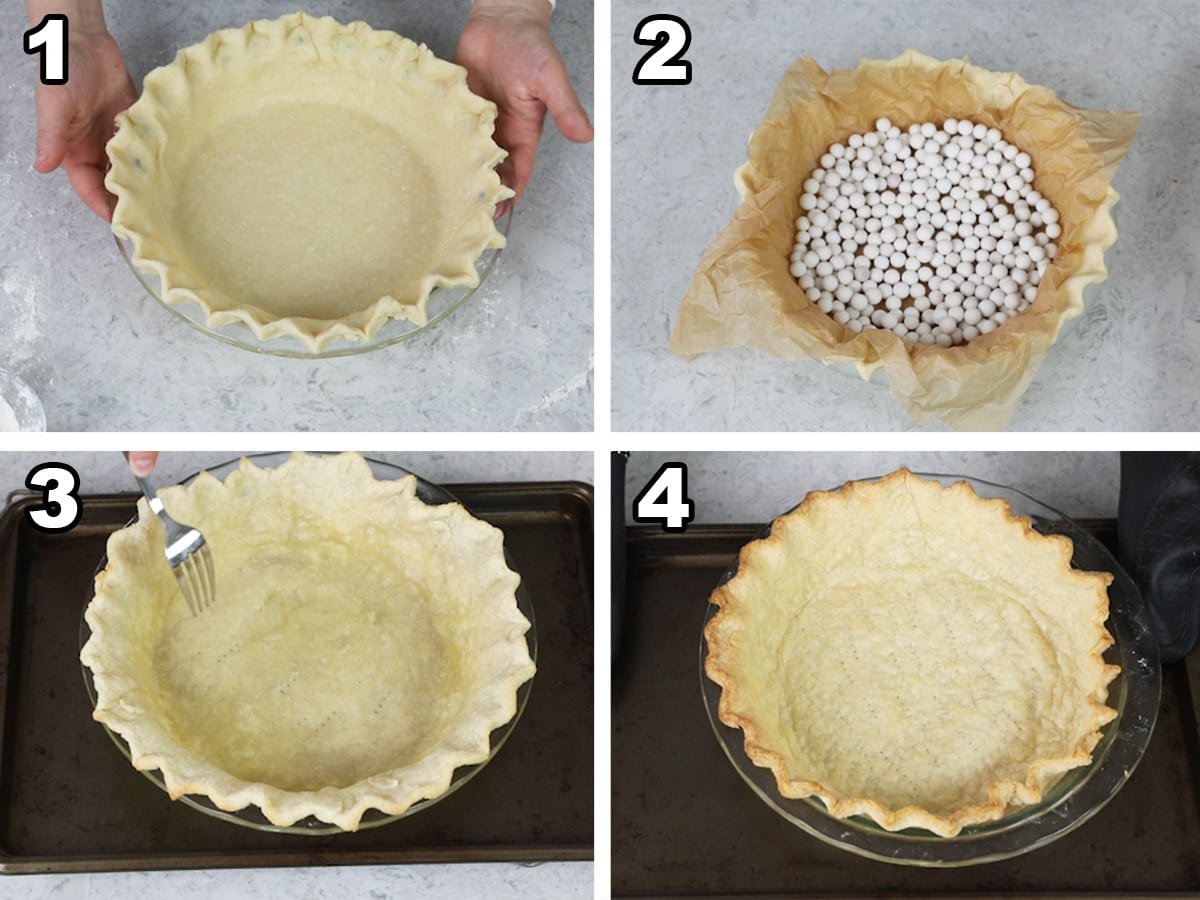
Source: mycountrytable.com
Step 1: Fit the dough into the pie plate
Roll the dough to an even thickness, then place it in the plate. Ease it into the corners rather than stretching it. Trim and crimp the edges as desired.
Step 2: Chill the shaped shell
Refrigerate the shell for at least 30 minutes as a useful starting point. A well-chilled shell is less likely to shrink or lose its shape in the oven.
Step 3: Heat the oven
Preheat to the temperature specified by the recipe, commonly around 375°F for blind baking. Make sure the oven has reached temperature before the shell goes in.
Step 4: Line the shell
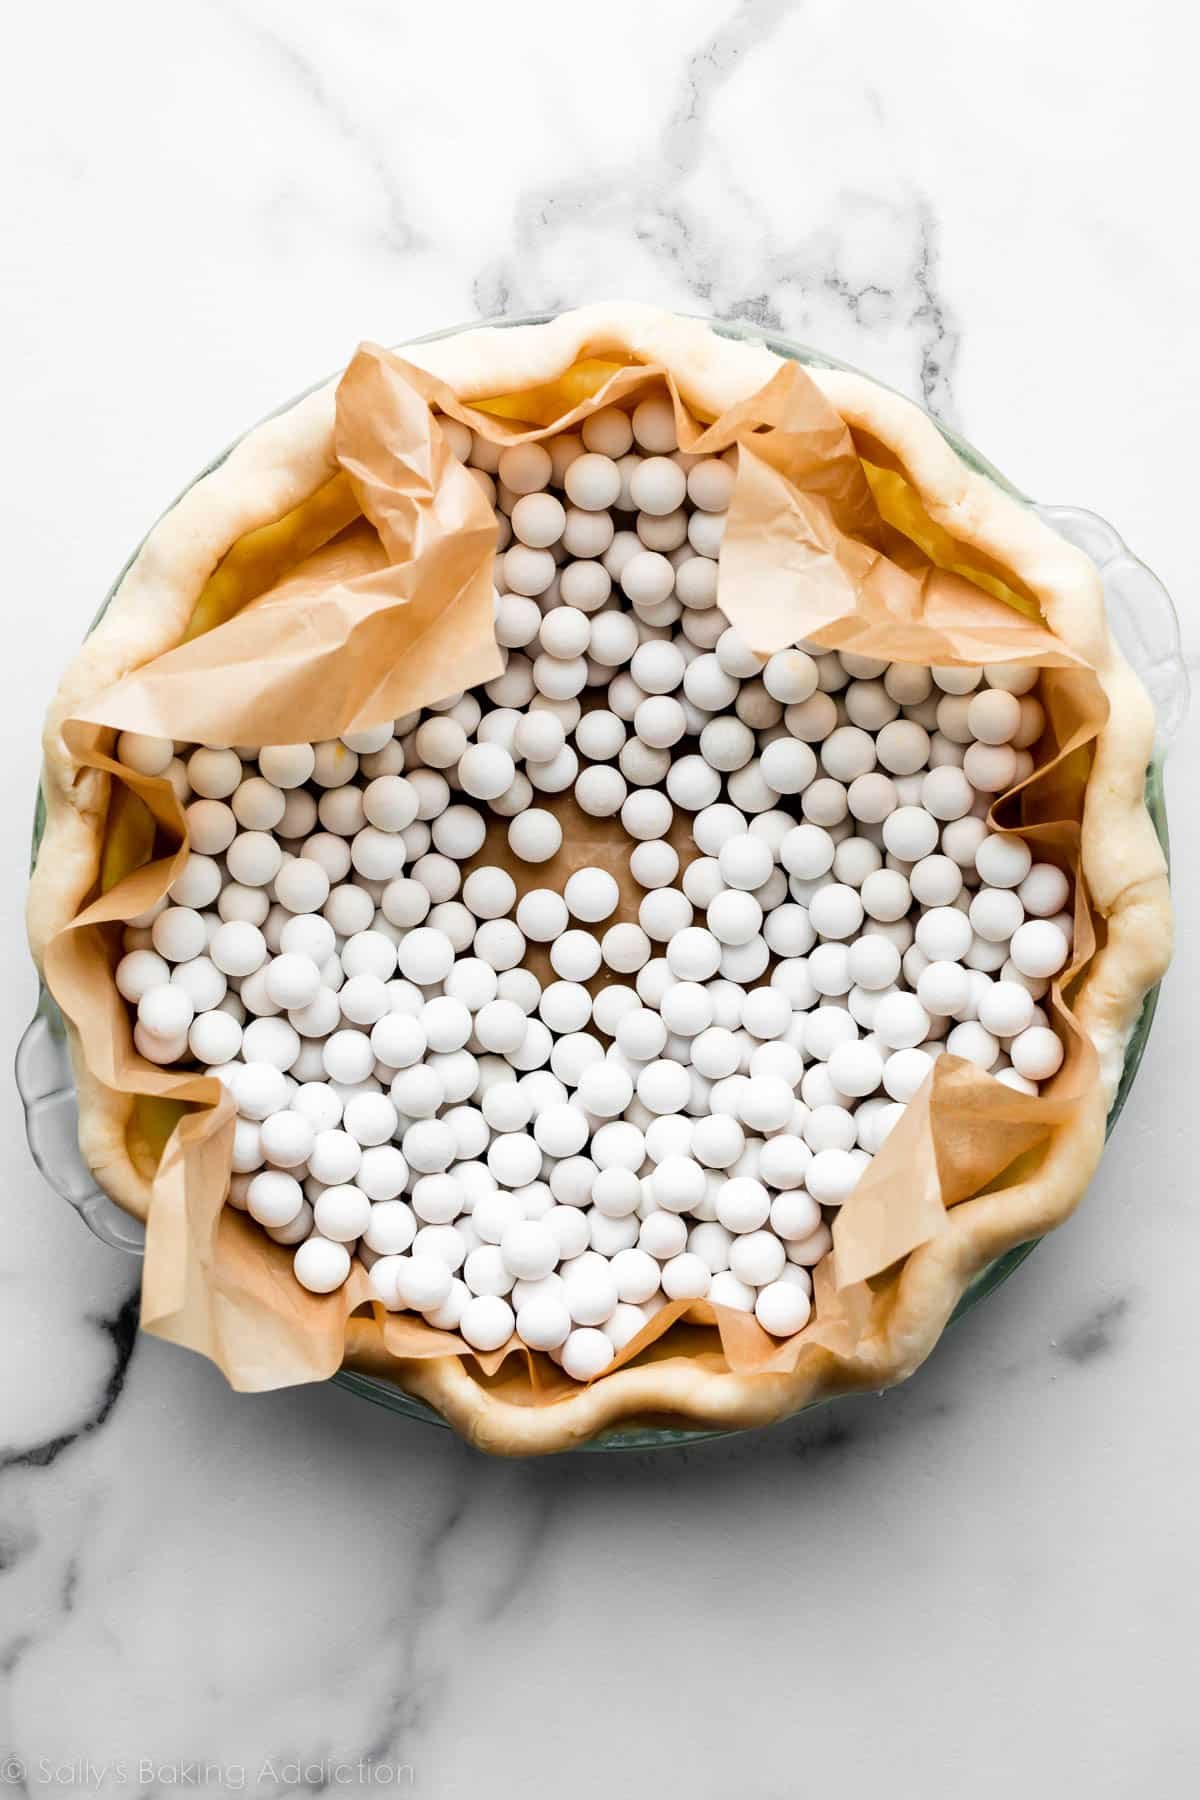
Place parchment over the cold dough and press it gently into the base and sides. Leave enough paper to lift the weights out without touching the hot crust.
Step 5: Add the weights
Fill the lined shell with pie weights or a suitable substitute. Spread them across the base and up the sides so the pastry has support where it needs it.
Step 6: Bake with the weights
Bake until the edge looks set and begins to take on a little color. Depending on the oven and dough, this stage often takes about 15 to 20 minutes.
Step 7: Remove the parchment and weights
Lift the paper slowly and keep your hands clear of the hot plate. If the dough sticks to the paper, pause and ease it away instead of tearing the crust.
Step 8: Finish the bake
For a par-baked shell, bake just until the base looks dry and set. For a fully baked shell, continue until the bottom is cooked through and the crust is golden.
Step 9: Cool before filling
Place the shell on a heat-safe rack. Let it cool as the recipe directs before adding a filling, so steam can escape and the pastry can firm up.
How to Tell When the Pie Shell Is Ready
A par-baked shell should have edges that hold their shape and a base that no longer looks like raw, wet dough. The color may remain fairly pale, depending on the recipe. This is normal when the shell will return to the oven with its filling.
A fully baked shell should have a dry-looking base and an even golden color. The center should not look glossy or pasty. If the rim browns much faster than the bottom, protect the edge with a pie shield or loose strips of foil, taking care not to press them into the pastry.
For partial baking
Look for a set crust and a base that has begun to dry, not necessarily a deep brown color.
For full baking
Look for a dry center and a golden base. Add a few minutes at a time if the middle still appears underdone.
How Long Should You Bake a Pie Shell?
The baking time depends on whether the shell will be partially or fully baked. Dough thickness, pan material, oven accuracy, and the type of pastry can all change the result. Use the following table as a general guide for a standard pie shell baked near 375°F, unless your recipe gives different instructions.
Begin checking the crust before the end of the estimated range. A thin crust in a metal plate may brown faster than a thicker shell in a ceramic dish. A frozen crust may also need a different method from fresh dough, so check its package directions.
Source: sallysbakingaddiction.com
Approximate Baking Times
These times are estimates, not a guarantee that every pie shell will be done at the same minute. Watch the pastry for the signs in the final column and adjust as needed.
Weighted stage
About 15 to 20 minutes, or until the edges look set.
Par-baked shell
Often about 5 to 10 additional minutes without weights, stopping when the base looks dry and partly cooked.
Fully baked shell
Often about 10 to 15 additional minutes without weights, or until the base is dry and the pastry is golden.
Frozen prepared crust
Follow the package directions, since some crusts are designed to bake from frozen and others require thawing.
Why Temperature Matters
The oven must be hot enough to set the pastry before the sides slump. At the same time, the crust needs enough time for the center to cook through. A high temperature does not always mean a better shell, especially if the rim burns before the bottom is ready.
If your oven tends to run hot, use an oven thermometer to check its actual temperature. Make small changes only when needed, and keep the recipe’s stated temperature as your first guide.
Par-Baking vs. Fully Baking a Pie Shell
Choose par-baking when the filling needs more time in the oven and full baking when the shell will hold a filling that is already cooked or does not need baking. The distinction matters because a crust can become too dark or dry if it receives a full blind bake and then spends a long time baking again.
Some fillings need a barrier to reduce moisture moving into the crust. A fully baked shell may be brushed with a thin layer of egg wash and briefly returned to the oven in recipes that recommend it. This can help form a seal, but it is not required for every pie and should not replace the recipe’s main baking steps.
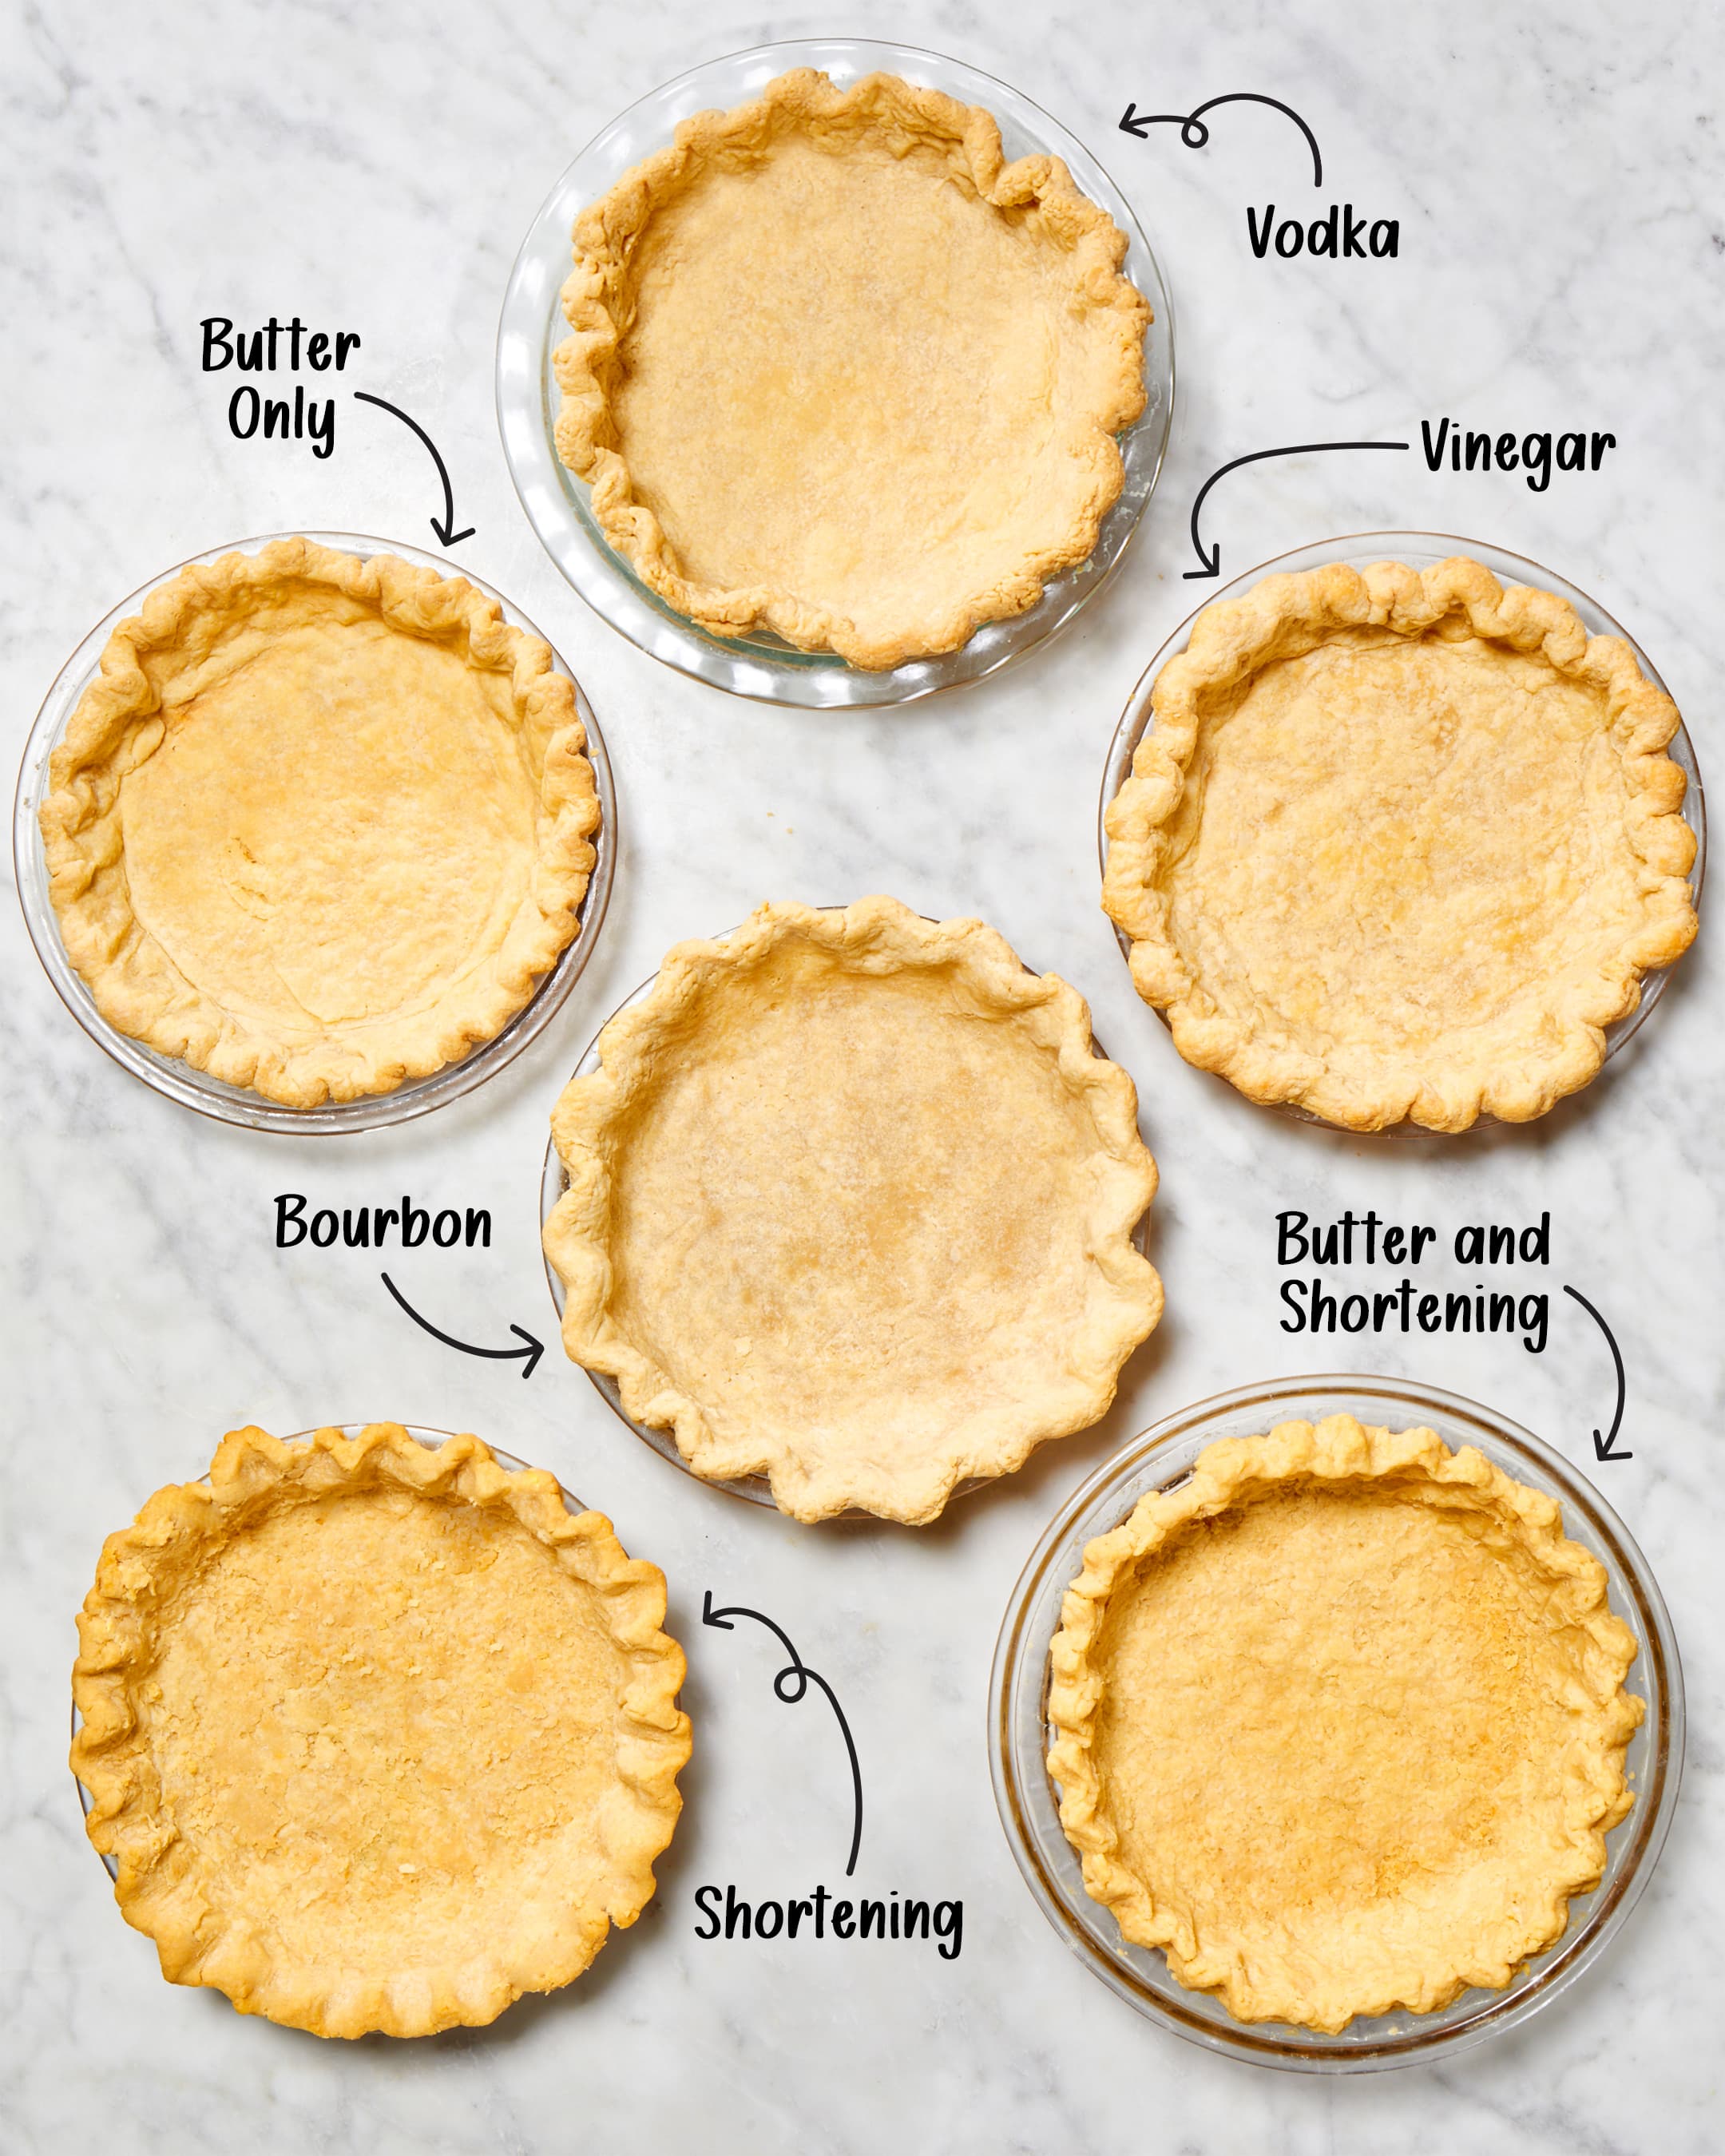
Source: cdn.apartmenttherapy.info
Choose par-baking
For recipes that call for a partially cooked shell before the filling is added and baked.
Choose full blind baking
For chilled cream pies, some fresh fruit fillings, and other recipes where the filling will not cook inside the shell.
Follow the recipe for custard pies
Custard pies vary. Some begin with raw pastry, while others call for a partially baked crust to help the base cook properly.
Can You Blind Bake a Frozen Pie Shell?
Yes, if the dough or package instructions allow it. Some frozen shells are designed to go straight into the oven, while others need to thaw first. Blind baking a frozen shell may require a different time and method from one made with freshly rolled dough.
Do not assume that every frozen crust can be baked in its original packaging. Remove any packaging that is not rated for oven use, and use a pie plate or pan that is safe at the required temperature.
Read the package
Check the thawing, lining, weighting, and temperature instructions before baking.
Common Pie Shell Problems and How to Fix Them
Most pie shell problems come from warm dough, poor support, uneven thickness, or removing the crust too soon. A few changes to the next bake can make a clear difference. For the shell already in the oven, focus on what can still be corrected without damaging the pastry.
Source: i.pinimg.com
The sides slid down
The dough may have been too warm, stretched during shaping, or left without enough weight. Chill the shell before baking, ease the dough into the plate, and support the sides with weights.
The base puffed up
The dough may not have been weighted evenly. Use parchment that covers the base and sides, and spread enough weights across the shell. Dock the dough only when the recipe calls for it.
The bottom is pale or soft
The shell may need more time after the weights come out. Return it to the oven in short intervals until the base looks dry and, for a full bake, golden.
The rim browned too fast
The edge may be thinner than the base or too exposed to heat. Shield the rim with a pie shield or foil and continue baking until the center is ready.
The crust shrank
The dough may have been stretched or insufficiently chilled. Avoid pulling the dough to fit the plate, and allow time for it to rest in the refrigerator before baking.
The crust cracked
Dry dough, thin spots, or rough handling can lead to cracks. Patch small cracks with a little spare dough before baking, pressing gently to join the edges.
What If the Crust Is Still Soft After Baking?
First, decide whether the shell is meant to be par-baked or fully baked. A partly baked shell can remain lighter in color because it needs more time with the filling. A fully baked shell should not have a wet, raw-looking center.
If the shell is empty and still underdone, put it back in the oven and check it every few minutes. If it already holds a delicate filling, further baking may not be suitable. Follow the filling recipe’s directions rather than trying to fix the crust with extra heat that could damage the filling.
For an empty shell
Continue baking in short intervals and watch the center and edges.
For a filled pie
Use the cooking instructions for that specific filling and avoid making temperature changes without a recipe-based reason.
Tips for a Crisp, Flaky Pie Shell
A crisp pie shell starts before baking. Keep the dough cool, avoid stretching it, and give the shaped crust time to chill. These steps help the pastry retain its shape and support an even bake.
During baking, use enough weights to hold the dough against the plate. Remove them only when the pastry has set enough to stand on its own. Once the shell is done, let it cool on a rack rather than leaving it in a hot oven that could continue to darken the edges.
Source: seasonalroots.com
Keep the dough cold
If the dough becomes soft while rolling or shaping, refrigerate it again before baking.
Avoid stretching
Let the dough settle into the plate instead of pulling it tight. Stretched dough is more likely to shrink in the oven.
Use even thickness
A very thin base can brown too fast, while thick areas may stay underdone. Roll the dough evenly and check the center before calling the shell finished.
Cool on a rack
Air can circulate around the plate, helping the shell cool without trapping as much steam underneath.
Add filling at the right time
Let the shell cool when the recipe calls for a cooled crust. Follow the filling’s storage and food-safety instructions once it is assembled.
Should You Brush the Crust With Egg Wash?
Egg wash is not needed for every pie shell. Some recipes call for a light coat of beaten egg or egg white after the weights are removed, followed by a brief return to the oven. This can help create a barrier against moisture from certain fillings.
Use egg wash only when it fits the recipe. A thick coat can affect the texture, and the shell still needs to be baked to the proper stage. Do not treat an egg wash as a substitute for fully cooking the crust when the recipe requires a fully baked shell.
Use a thin layer
If the recipe recommends egg wash, spread it lightly over the base and follow the stated additional baking time.
How to Store a Baked Pie Shell
Let the shell cool fully before storing it. Trapped steam can soften the pastry, so do not cover a warm crust tightly. Once cool, protect the shell from dust and moisture with a suitable cover or airtight container.
For short-term use, follow the recipe’s storage directions and keep in mind that a plain baked shell is different from one filled with custard, cream, meat, or other perishable ingredients. A filled pie may need refrigeration even when an empty shell can be held at room temperature for a limited time.
For longer storage, a plain baked shell can often be frozen if wrapped well and protected from breakage. Thaw it as the recipe recommends and check that the crust has not absorbed moisture before adding the filling. Avoid stacking heavy items on top of a delicate shell.
Source: i.pinimg.com
Cool before covering
Allow the shell to reach room temperature so steam does not collect under the cover.
Keep it dry
Moisture can soften crisp pastry. Store the shell in a dry, covered space suited to the planned storage time.
Freeze with care
Wrap the shell securely and place it on a level surface so it does not crack.
Follow filling safety rules
Once a perishable filling is added, use the storage and refrigeration guidance for that filling rather than the rules for an empty crust.
Frequently Asked Questions
Q
What temperature is best for baking a pie shell?
Around 375°F is a useful starting point for blind baking many standard pie crusts. The correct temperature depends on the recipe and the dough, so use the recipe’s instructions when available. Check the shell as it bakes rather than relying on temperature and time alone.
Q
Should I poke holes in a pie shell before baking?
Some recipes call for docking, which means pricking the base with a fork to let steam escape. When the shell is lined and filled with pie weights, docking may not be necessary. Follow the method for your specific crust, because holes can allow wet filling to seep through later.
Q
Can I use rice instead of pie weights?
Yes. Uncooked rice can act as a weight when it is placed on parchment inside the shell. Dry beans are another common substitute. Keep the rice or beans separate from food you plan to eat as a normal cooked meal after they have been used for baking weights.
Q
How do I know if a pie shell is fully baked?
A fully baked shell has a dry-looking base and a golden color across the center and edges. The middle should not look wet or pasty. If it still looks underdone, continue baking in short intervals while watching the rim so it does not burn.
Q
Do I need to cool a pie shell before adding filling?
Often, yes, especially when the filling is cold or already cooked. Cooling helps the pastry firm up and reduces unwanted steam. Some recipes call for a warm shell or an additional bake with the filling, so follow the method for the pie you are making.
✦ Wrapping Up
Conclusion
Learning how to bake pie shell comes down to three main steps: chill the dough, hold it in place with weights, and bake it until it reaches the stage your filling needs. A par-baked shell should be set and partly cooked, while a fully baked shell should have a dry base and an even golden color.
Do not rely on the timer alone. Check the edges and center, protect the rim if it browns too quickly, and give the shell time to cool when the recipe calls for it. These small checks help you avoid a pale, soggy base or sides that slide down the plate.
💡 Key Takeaway
Before you start, check whether your recipe needs a par-baked or fully baked shell. Chill the shaped dough, line it with parchment, add pie weights, and bake near 375°F unless your recipe says otherwise. Remove the weights and finish baking until the crust reaches the right color and texture.