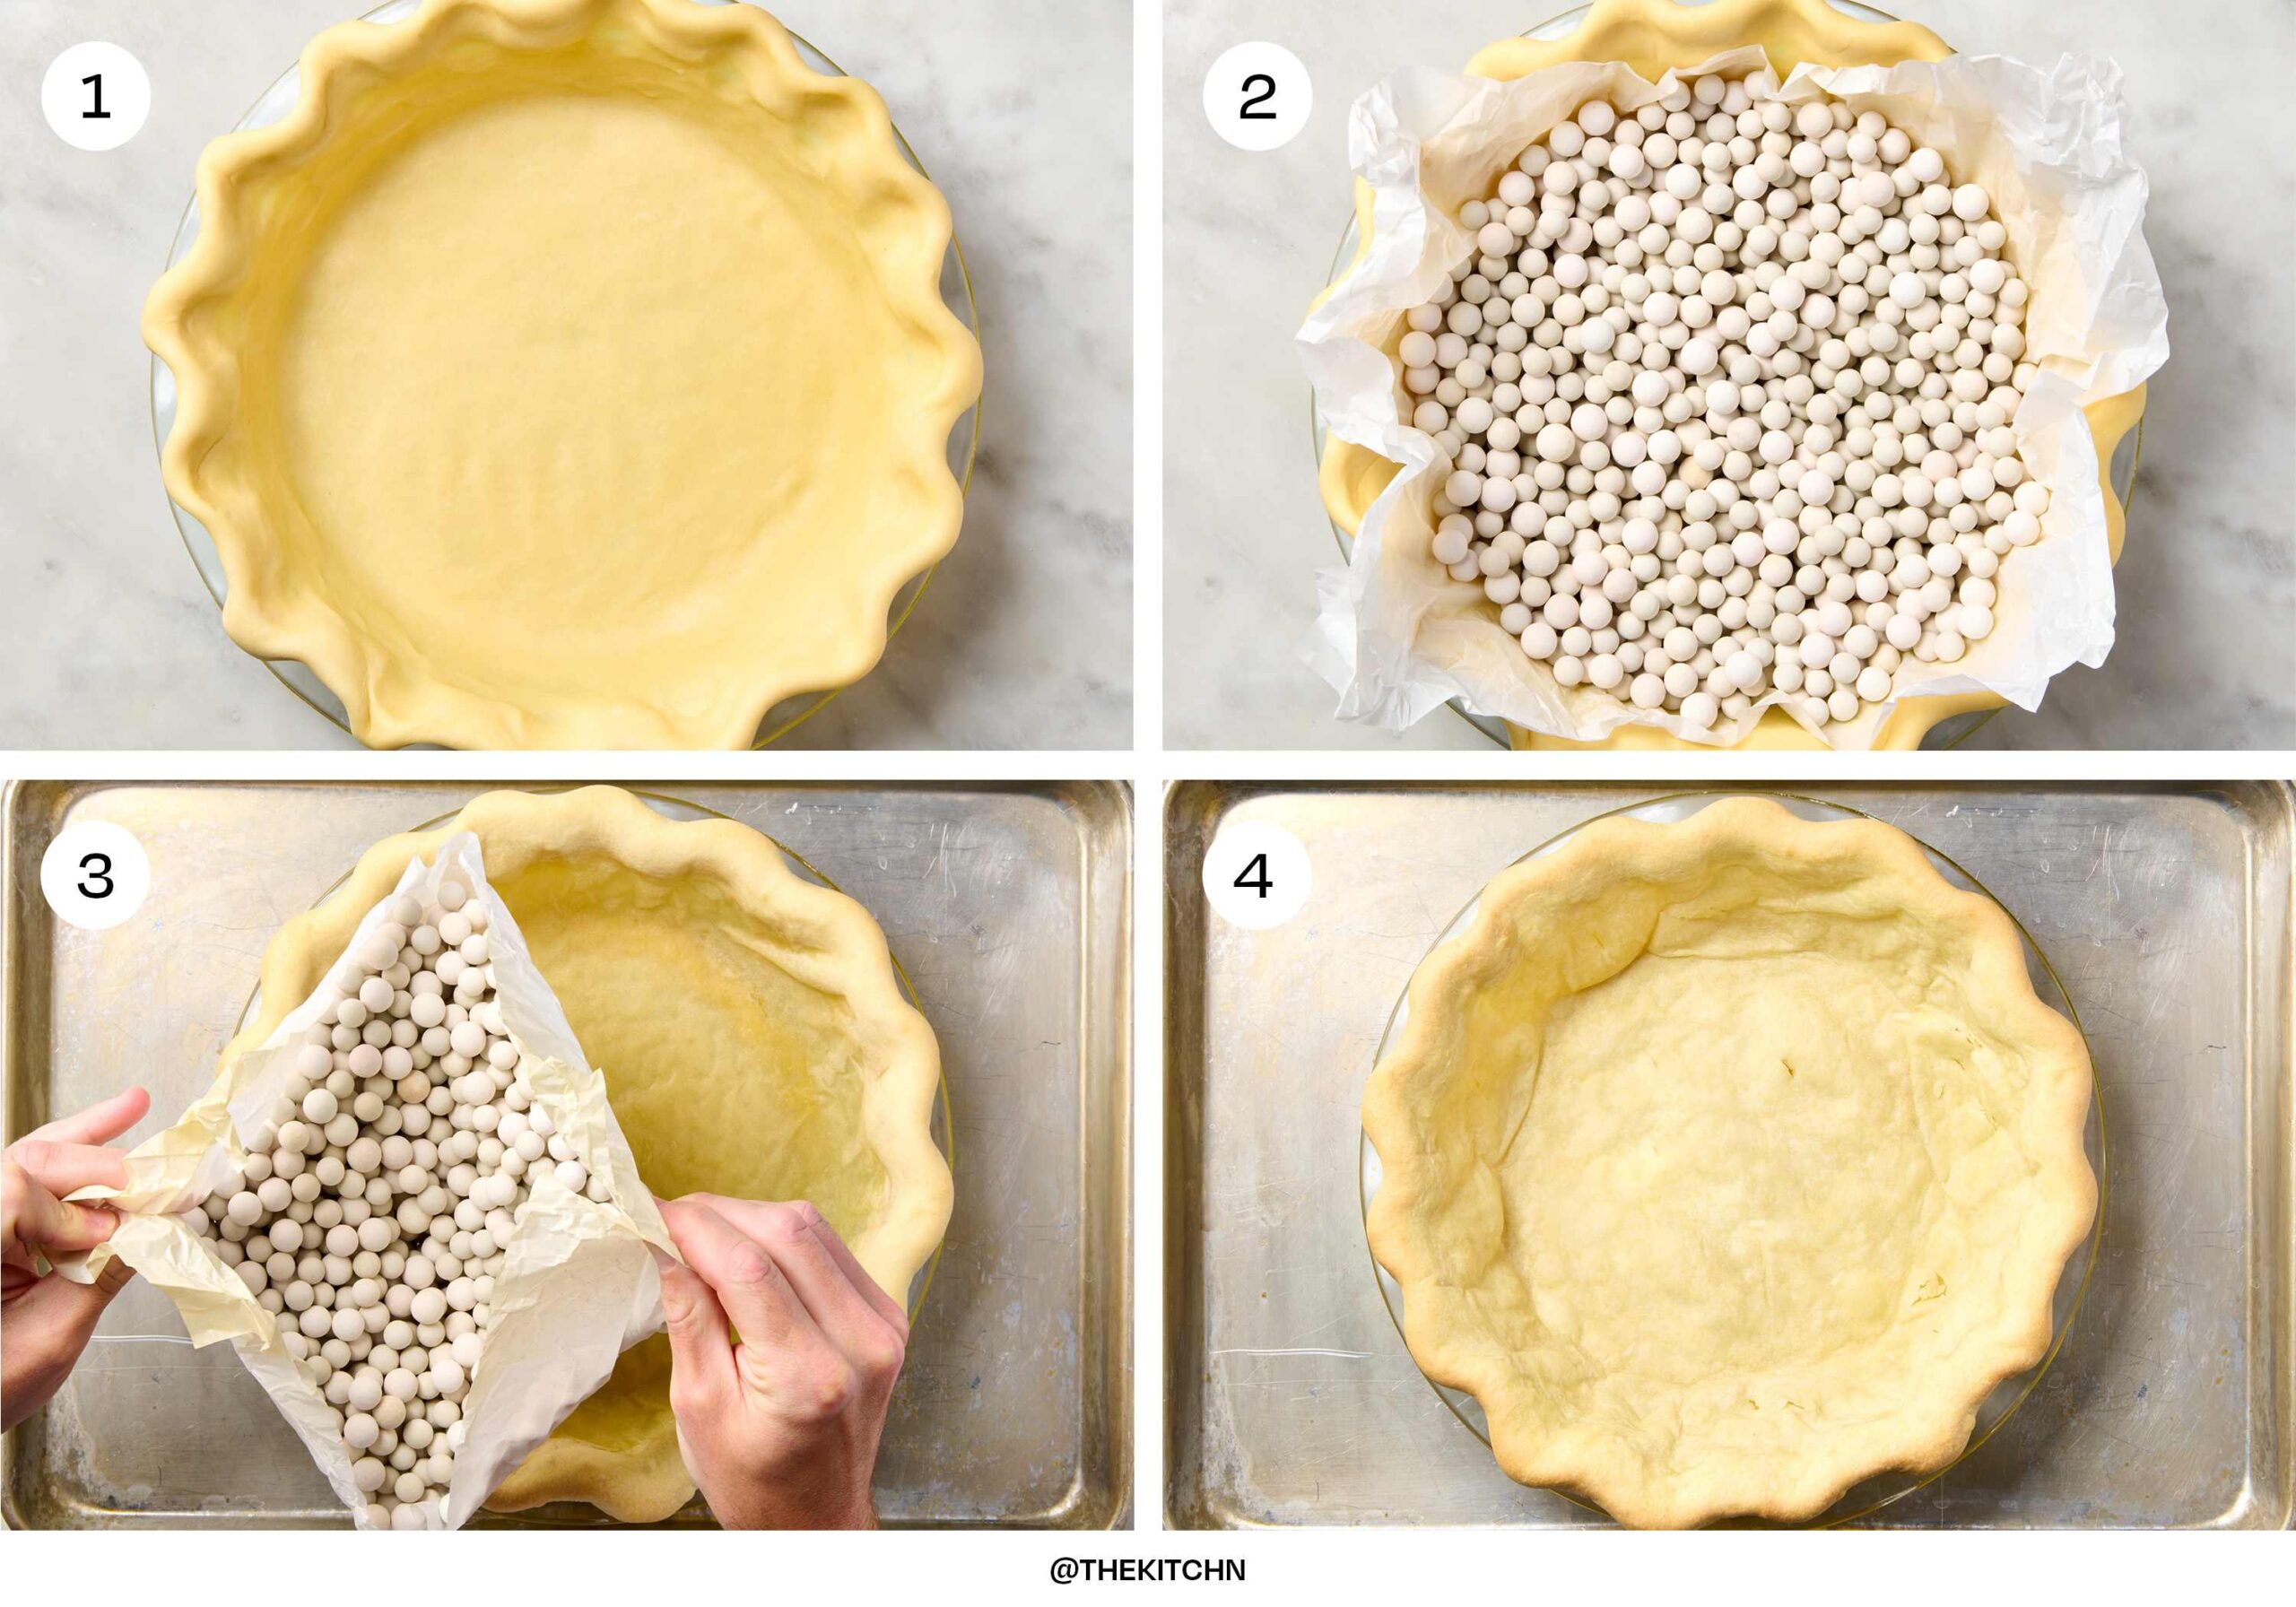
Blind bake a pie crust at 375°F to 400°F for most standard recipes. A common method is to bake it at 375°F with pie weights for about 15 to 20 minutes, then remove the weights and bake for another 5 to 15 minutes. Follow your recipe when it gives a specific temperature and time.
In American home kitchens, blind baking helps make pies with crisp bottoms and firm edges. It is often used for pumpkin pie, pecan pie, quiche, and cream pies. The method cooks the crust before the filling goes in, or before a filling that needs little or no baking is added.
The best oven temperature depends on the dough, the pie plate, and how you plan to use the crust. Many recipes call for 375°F or 400°F. A cooler oven can give the dough more time to set, while a hotter oven can brown it faster. The goal is a crust that holds its shape and has the right color for the filling.
Blind baking is simple once you know what to look for. Chill the dough, line it with parchment, add pie weights, and bake until the edges look set. Then remove the weights and finish baking if the recipe calls for a fully baked shell. These steps help reduce shrinking, puffing, and a soggy base.
For most standard pie crusts, set the oven to 375°F or 400°F. Both temperatures can work well, but the right choice depends on the recipe and whether you need a partly baked shell or a fully baked crust. If your recipe gives an exact temperature, use that as your first choice.
A temperature of 375°F is a useful starting point for many homemade pastry crusts. It allows the fat to melt and the dough to set while the crust begins to brown. At 400°F, the crust may cook and color more quickly, so watch the edges and base closely.
Always preheat the oven before putting the crust inside. An oven that is still warming up can change how the dough sets and may lead to uneven baking. An oven thermometer can help if your oven runs hot or cold.
Source: crazyforcrust.com
375°F
A common choice for a standard homemade pie crust. It gives you time to watch the crust as it sets and browns.
Use the stated setting for special doughs, frozen shells, or recipes with a tested baking method.
Does Every Pie Crust Need the Same Temperature?
No. A homemade butter crust, a shortening-based crust, and a store-bought frozen shell may behave differently in the oven. Dough thickness, moisture, and the type of fat can also affect how quickly the pastry sets and browns.
A glass pie plate may heat differently from a metal plate, and a dark metal pan can brown the base faster. These differences do not always require a temperature change, but they make visual checks useful. Avoid changing the oven setting without a clear reason.
Homemade pastry
Follow the recipe and chill the shaped dough before baking.
Frozen pie shell
Check the package directions. Some shells are meant to bake from frozen, while others call for thawing.
Whole-wheat or specialty dough
Use the recipe’s method because differences in moisture and structure can affect the bake.
How Long Should You Blind Bake a Pie Crust?
At 375°F, a standard pie crust often needs about 15 to 20 minutes with pie weights, followed by 5 to 15 minutes without them. The exact time varies with the dough, pan, and desired finish. Treat these times as a guide rather than a strict rule.
The first stage helps the sides and base set while the weights hold the dough in place. The second stage lets moisture escape from the base and helps it gain color. If you are making a fully baked shell for a no-bake filling, the second stage may take longer than it would for a crust that will bake again with its filling.
Check the crust instead of relying on the clock alone. The rim should look set, and the base should no longer look like wet dough. For a fully baked shell, look for an even golden color and a dry surface.
Source: afamilyfeast.com
First stage
Bake for about 15 to 20 minutes with parchment and pie weights, or until the edges begin to set.
Second stage for a partly baked crust
Remove the weights and parchment, then bake for about 5 to 10 minutes if the recipe calls for a partial bake.
Second stage for a fully baked crust
Bake without the weights for about 10 to 15 minutes or until the base is dry and golden.
How Can You Tell When the Crust Is Ready?
A partly baked crust should have firm edges and a base that looks dry enough to hold its shape. It may still be pale because it will return to the oven with the filling. This is often enough for pies with a filling that needs more baking time.
A fully baked shell should be more evenly golden, including across the bottom. It should not look wet or feel soft in the center. If the base remains pale after the weights come out, bake it for a few more minutes and check again.
Ready for a filling that will bake again
The dough is set, the sides hold their shape, and the base has begun to dry.
Ready for a no-bake filling
The base and sides are fully baked, dry, and golden before cooling.
Blind Baking vs. Par-Baking: Which Method Do You Need?
Blind baking means baking a pie crust before adding its filling. Par-baking is a partial bake, while a fully blind-baked shell is cooked until the pastry is done. People often use these terms in similar ways, so the recipe’s instructions matter more than the label alone.
A partly baked crust works well when the filling also needs time in the oven. The base gets a head start, which can help it resist moisture from the filling. A fully baked shell is better suited to fillings that do not need further oven time, such as many chilled cream pies.
Do not fully bake a crust when the recipe expects a long second bake unless the recipe explains how to adjust the method. The rim and base may become too dark before the filling is ready.
Source: handletheheat.com
Par-baked crust
Partly cooked, usually for a pie that will return to the oven with its filling.
Fully blind-baked crust
Baked until golden and dry, often for chilled or no-bake fillings.
Unbaked crust
Used when the filling and crust are meant to bake together from the start.
Which Pies Usually Need a Partly Baked Crust?
Some custard pies, quiches, and pumpkin pies benefit from a partly baked crust, depending on the recipe. The pre-bake can help the base firm up before it meets a wet filling. Not every recipe requires this step, so check the instructions for your specific pie.
If the recipe calls for blind baking, use pie weights for the first stage and remove them for the finish. Let the crust cool slightly if the recipe says to do so before adding the filling. Then return the pie to the oven for the stated baking time.
Pumpkin pie
Some recipes call for a partial bake to help the base cook through, while others use an unbaked crust.
Quiche
A partly baked crust can help limit a soggy base beneath an egg and cream filling.
Which Pies Usually Need a Fully Baked Shell?
Cream pies and many chilled pies need a fully baked crust because the filling may not spend enough time in the oven to cook the pastry. Bake the shell until golden, then let it cool before adding the filling.
Adding a cold filling to a hot shell can affect the filling’s texture and may create extra moisture. Follow the recipe’s cooling instructions so the crust stays firm and the filling sets as intended.
Chocolate cream pie
Usually needs a fully baked and cooled shell if the filling is prepared separately.
Lemon icebox pie
Often uses a fully baked shell when the filling is chilled rather than baked inside the crust.
How to Blind Bake a Pie Crust Step by Step
The best way to blind bake a crust is to chill it, line it, weigh it down, and bake it in stages. These steps help the dough hold its shape and cook more evenly. You will need a pie plate, parchment paper, pie weights or a suitable dry substitute, and an oven that has been preheated.
Source: preppykitchen.com
Step 1: Fit the dough into the pie plate
Roll out the dough and ease it into the plate. Avoid stretching it, since stretched dough may pull back as it bakes.
Step 2: Trim and shape the rim
Leave enough dough for the edge, then shape it as the recipe directs. Press the dough gently into the corners.
Step 3: Chill the crust
Refrigerate the shaped shell until firm. A firm crust is less likely to slump as the fat melts in the oven.
Step 4: Line the crust
Place a sheet of parchment paper over the dough and gently press it into the base and sides.
Step 5: Add pie weights
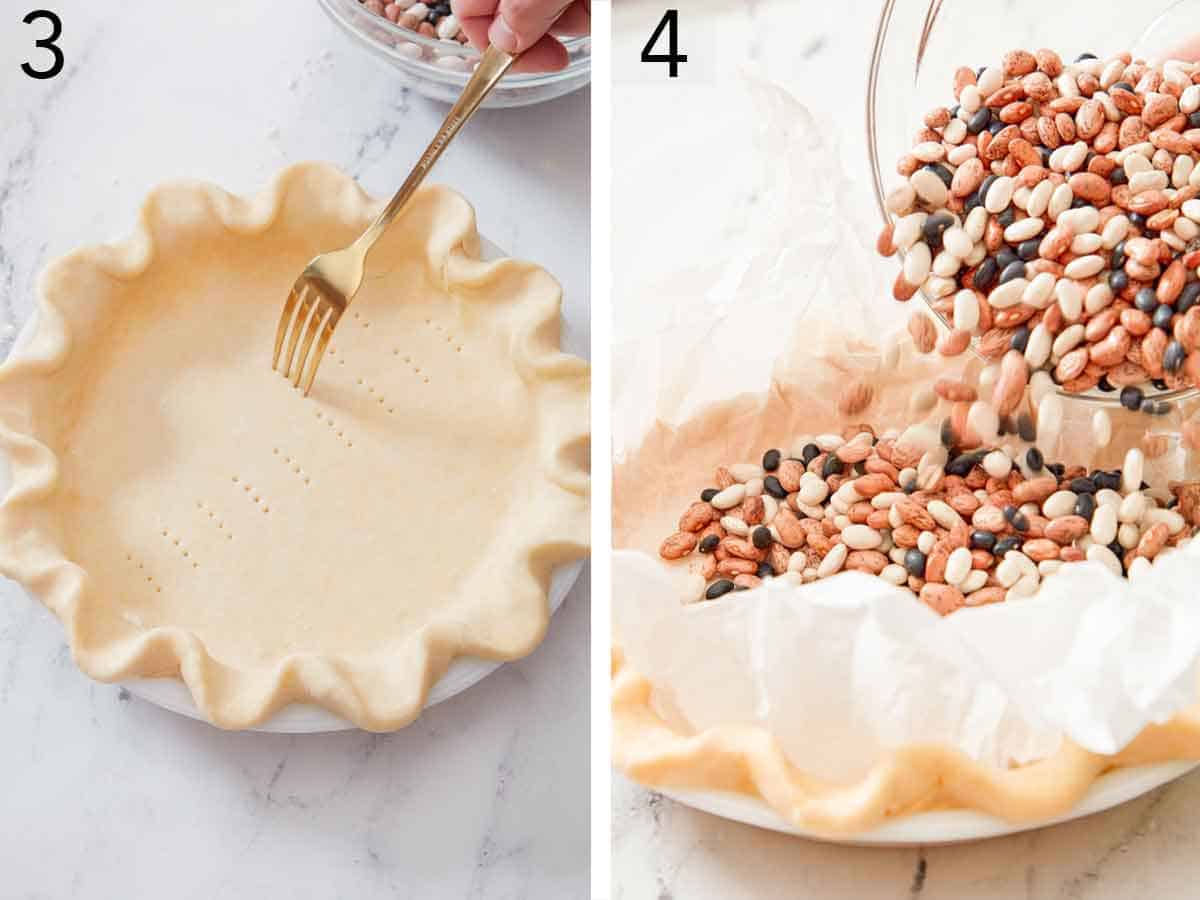
Fill the lined shell with pie weights or dry beans used for this purpose. Spread them across the base and toward the sides.
Step 6: Bake with weights
Bake at the recipe’s temperature, often 375°F, for about 15 to 20 minutes. Check that the rim has begun to set.
Step 7: Remove the weights
Carefully lift out the parchment and weights. The weights and pan may be hot, so use oven mitts and avoid spilling them.
Step 8: Finish baking
For a partial bake, continue until the base is set. For a fully baked shell, continue until the base and sides are golden and dry.
Step 9: Cool as needed
Use the shell according to the recipe. Cool it before adding a chilled filling, or proceed with the next step if the recipe calls for a warm crust.
What Can You Use Instead of Pie Weights?
Dry beans or uncooked rice can work as pie weights when placed over parchment paper. They add weight to the base and help support the sides during the first stage of baking. Keep these beans or rice separate from food you plan to cook and eat later, since repeated oven use may affect their quality.
Reusable ceramic or metal pie weights are another option. Whatever you use, spread the weight across the base rather than piling it only in the center. The sides need support too.
Ceramic or metal pie weights
Made for this task and easy to store for future pies.
Dry beans
A practical substitute that can be saved for use as pie weights.
Uncooked rice
Can serve as a weight when contained by parchment paper.
How to Keep a Pie Crust From Shrinking or Puffing Up
Chilling the dough and using pie weights are two of the most useful ways to limit shrinkage and puffing. Shrinking often happens when the dough has been stretched or when the gluten has not had enough time to relax. Puffing can happen when steam builds beneath the pastry.
Handle the dough gently when fitting it into the plate. Press it into the base and corners without pulling it to make it fit. If the dough keeps springing back while you roll it, let it rest in the refrigerator before trying again.
Do not skip the weights when the recipe calls for them. They hold the dough against the plate while the structure sets. Docking, or pricking the base with a fork, can help some crusts release steam, but it does not replace weights in every recipe.
Source: busycreatingmemories.com
Chill before baking
A cold, firm shell is easier to handle and less likely to lose its shape quickly in the oven.
Avoid stretching the dough
Ease it into the plate instead of pulling it across the bottom or sides.
Fill the shell with weights
Cover the base and support the sides during the first stage of baking.
Watch the rim
If the edge begins to brown too quickly, shield it with a pie shield or strips of foil, taking care not to cover the base unnecessarily.
Should You Dock the Pie Crust Before Blind Baking?
Docking means making small holes in the dough with a fork. These holes can let steam escape and may reduce large bubbles in some crusts. However, they also allow liquid filling to seep into the pastry if the crust is used for a wet filling before it is fully baked.
Follow the recipe’s instructions on docking. If it calls for parchment and weights, use that method even if you also make small fork holes. Avoid adding extra holes simply because a crust has puffed in a past bake.
Use docking when directed
It can help release steam in recipes designed for this method.
Do not rely on holes alone
Weights help keep the base and sides in place as the dough sets.
Common Blind Baking Problems and How to Fix Them
Most blind baking problems come from dough that is too warm, weights that do not cover the shell well, an oven that runs hotter than expected, or a crust that needs more time. Check the appearance of the dough before making a large change to the oven temperature. Small adjustments in time are often more useful than changing several things at once.
Source: delightfuladventures.com
The crust shrinks down the sides
The dough may have been stretched or insufficiently chilled. Next time, ease it into the plate, let it rest, and bake it while firm and cold.
The base puffs up
The weights may not cover the base well, or steam may be trapped under the dough. Use enough weights to support the base and follow the recipe’s docking instructions.
The bottom is pale and soft
The shell may need more time without the weights. Return it to the oven and check every few minutes until the base looks dry.
The rim browns too fast
The oven may be running hot, the crust may be thin, or the pan may brown quickly. Shield the rim and check the oven temperature.
The crust is greasy
The dough may have become too warm before baking, or the fat may have melted before the pastry set. Chill the shaped shell and preheat the oven fully.
The crust cracks
The dough may be dry or rolled too thin. Patch small cracks with a little spare dough before baking, pressing the patch gently into place.
Can You Fix a Soggy Bottom After Blind Baking?
If the crust is still in the oven and the base looks pale or damp, remove the weights when the sides have set and continue baking the shell. Check it often so the rim does not burn. If the pie has already been filled, the options are more limited because the filling may prevent the base from drying well.
For the next bake, make sure the oven is fully preheated, use the correct baking time, and remove the weights for the final stage when the recipe directs. Let a fully baked shell cool before adding a chilled filling, and avoid adding a warm or watery filling unless the recipe is designed for it.
Before adding filling
Continue baking the shell until the base looks dry and has the right color for its intended use.
After adding filling
Follow the pie recipe‘s remaining baking or chilling instructions. Do not assume that a longer bake will fix every soggy base.
Blind Baking Temperature and Time Guide
Use the table below as a practical reference for a standard pie crust. The times are approximate and assume a preheated oven, a chilled shell, and weights during the first stage. Your recipe may use a different method, especially for frozen pastry or a crust that will bake for a long time with its filling.
Source: handletheheat.com
Partly baked shell
At 375°F, begin with about 15 to 20 minutes with weights, then about 5 to 10 minutes without them. Stop when the pastry is set and the base begins to dry.
Fully baked shell
At 375°F, begin with about 15 to 20 minutes with weights, then about 10 to 15 minutes without them. Continue as needed until the base is golden and dry.
Hotter oven method
At 400°F, the crust may finish sooner. Check the recipe and watch the rim closely rather than using the same time without adjustment.
Quick Decision Guide
Choose the finish based on what goes into the shell next. A crust that will return to the oven needs enough baking to set the dough, but it may not need full color. A shell for a chilled filling needs to be fully baked before the filling is added.
The filling will bake inside the crust
Use a partial bake only when the recipe calls for it. The crust should be set, not fully browned.
The filling will not bake
Fully bake the shell until golden and dry, then cool it as directed.
The recipe uses frozen dough
Follow the package or recipe directions for baking from frozen or thawing first.
Frequently Asked Questions
Q
Can you blind bake a pie crust at 350°F?
Yes, some recipes use 350°F, but the crust may need more time to set and brown. Follow the recipe’s method and check the base for doneness. Do not assume that the same baking time used at 375°F will work at 350°F.
Q
Do you cover a pie crust when blind baking?
The crust is usually lined with parchment paper and filled with pie weights rather than covered with a lid. The paper helps keep the weights from touching the dough directly. If the rim begins to brown too fast, use a pie shield or carefully placed foil to protect the edge.
Q
Should the crust cool before adding filling?
It depends on the recipe. A fully baked shell for a chilled cream pie usually needs to cool before the filling goes in. A partly baked shell may receive the filling while warm or after a short rest, depending on the instructions.
Q
Can you blind bake without parchment paper?
Parchment is useful because it separates the dough from the weights and makes them easier to remove. Some recipes use foil, but it should be fitted carefully to avoid tearing the dough. Use a liner that is rated for oven use and follow its temperature limits.
Q
Do you need pie weights to blind bake a crust?
Pie weights are helpful because they hold the base and sides in place as the dough sets. Dry beans or uncooked rice can work as substitutes when placed over parchment. Without weights, the crust may puff up or slump, especially if the recipe relies on them.
✦ Wrapping Up
Conclusion
For most standard pie crusts, 375°F to 400°F is a useful temperature range for blind baking. Start with your recipe’s directions, use weights during the first stage, and remove them when the dough has set. A partly baked shell should be firm and pale, while a fully baked shell should be golden and dry.
Chilling the dough, avoiding stretched pastry, and checking the base before adding filling can help prevent common problems. Small differences in oven temperature, pan type, and dough can change the final bake, so use the time as a guide and look for signs of doneness.
💡 Key Takeaway
Preheat your oven to the temperature in your recipe, usually 375°F. Chill and line the crust, add pie weights, bake for about 15 to 20 minutes, then remove the weights and finish baking to the level your filling requires.