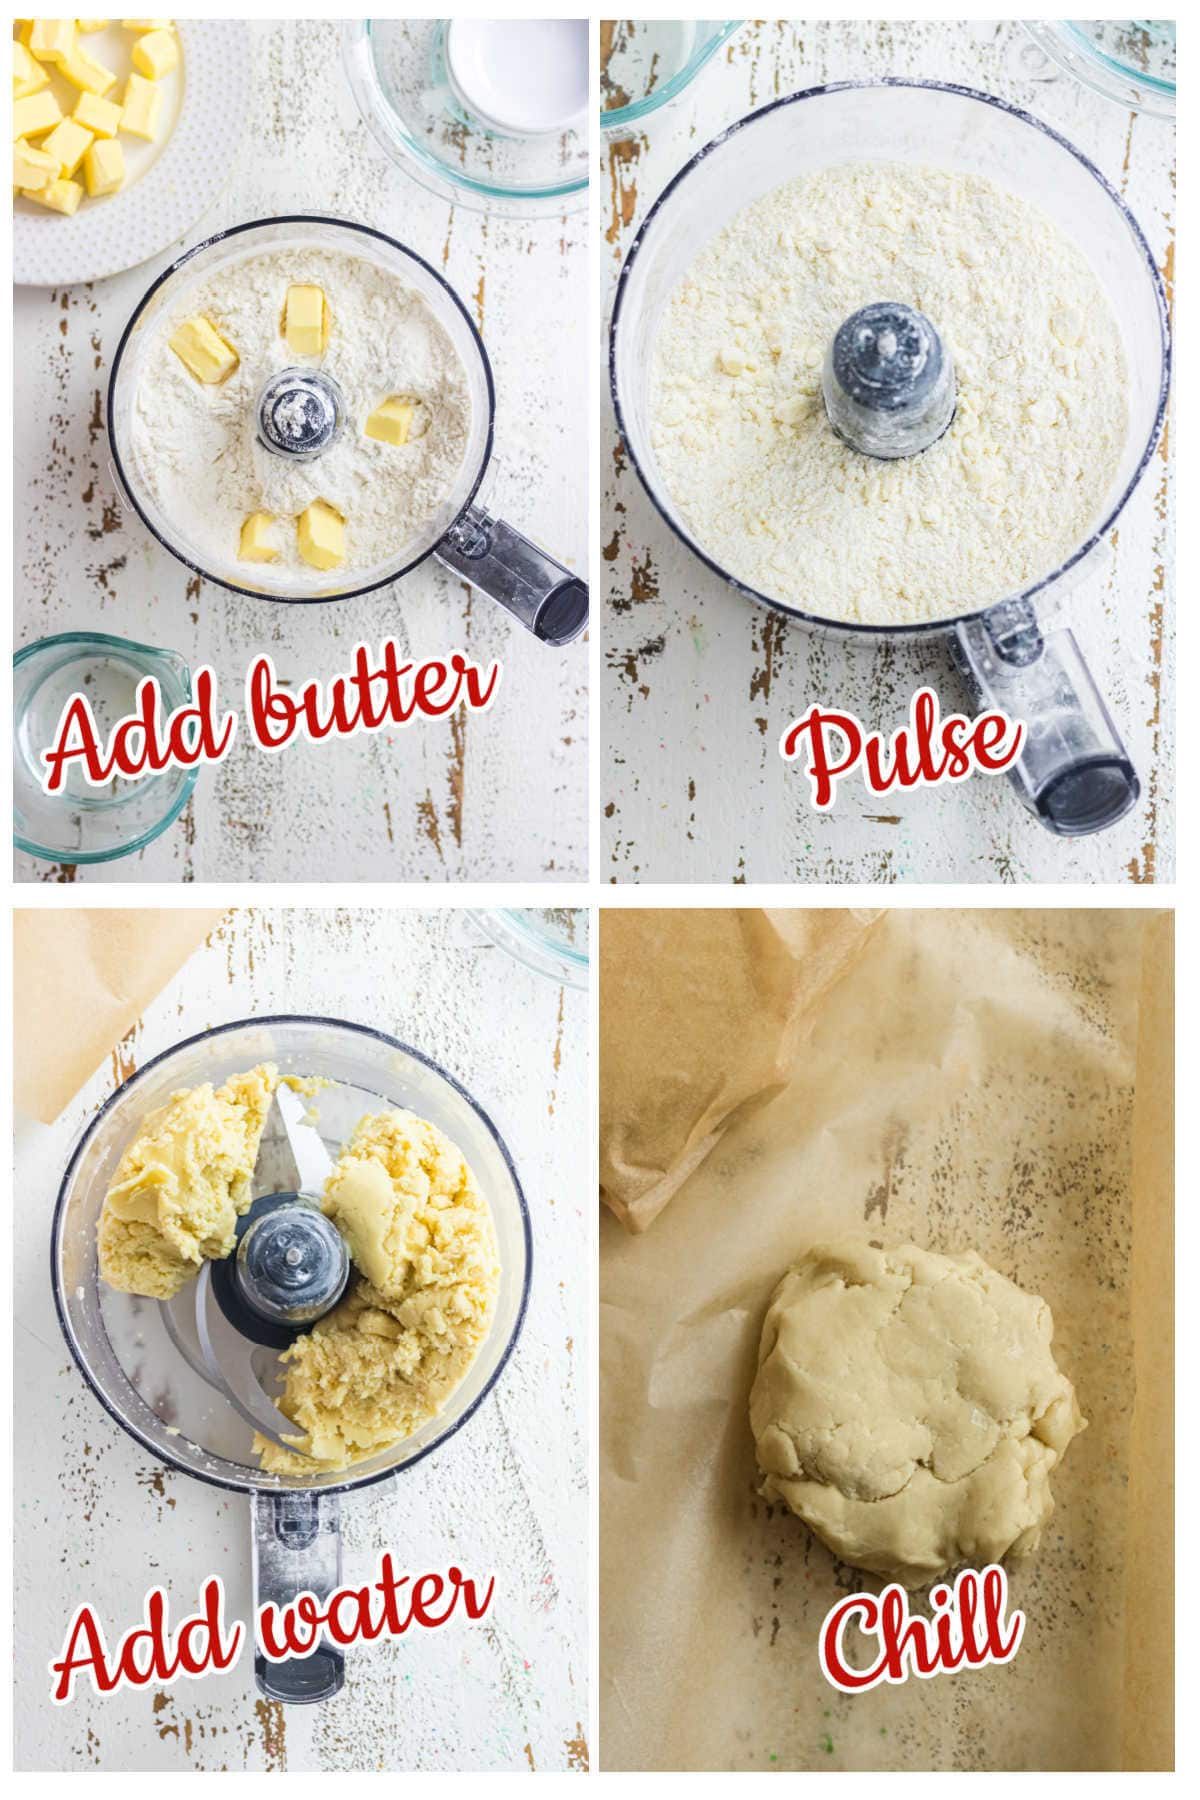
A food processor makes pie crust fast and easy. Pulse flour, salt, and cold butter until the mix looks like coarse crumbs. Add ice water a little at a time until the dough starts to hold together. Shape it into a disk, chill it, then roll it out for your favorite pie.
Across the United States, homemade pie is a favorite for Thanksgiving, Christmas, summer cookouts, and family dinners. A good crust can make an apple pie, pumpkin pie, chicken pot pie, or fresh berry pie taste even better. You do not need a pastry cutter or years of baking skill to make one at home.
This pie crust recipe for food processor uses a few basic items and a short list of steps. The machine cuts cold butter into the flour with little hand work. The key is to use short pulses, add water with care, and stop before the dough turns into a smooth ball inside the bowl.
The method works for many sweet and savory pies. It gives you control over the fat, salt, and dough texture. You can also make the dough ahead, keep it cold in the fridge, or freeze it for a later baking day.
This recipe makes enough dough for a standard 9-inch double-crust pie or two 9-inch single-crust pies. It uses all-purpose flour, unsalted butter, salt, and ice water. The method is simple, but the temperature of the butter and the amount of water matter.
Measure the ingredients before you begin. Cut the butter into small cubes and chill it until firm. Fill a small cup with ice water, but keep the ice out of the dough.
A standard food processor with an S-shaped metal blade works well for this task. Check your machine’s manual before use, and do not fill the bowl beyond its stated capacity.
Source: www.youtube.com > OlgasFlavorFactory
Preparation time
About 15 minutes of active work, plus at least 1 hour of chilling time.
Yield
One double crust for a 9-inch pie or two single crusts.
Equipment
A food processor with a metal blade, measuring cups or a kitchen scale, a rolling pin, plastic wrap or a reusable food-safe wrap, and a pie plate.
Best use
Fruit pies, pumpkin pies, custard pies, quiches, and savory meat or vegetable pies.
Ingredients
Use the amounts below for a basic all-butter crust. The butter gives the pastry a rich taste and helps form flaky layers when small pieces remain in the dough.
2 1/2 cups all-purpose flour
Spoon the flour into the measuring cup and level it off. Too much flour can make the dough dry and tough.
1 teaspoon fine salt
Use less if your butter is salted, adjusting to your taste and the filling.
1 cup unsalted butter
Use 2 sticks, or 16 tablespoons, of cold butter cut into small cubes.
6 to 8 tablespoons ice water
Start with 6 tablespoons and add more only if the flour still looks dry and will not clump.
Optional ingredients
A small amount of sugar can add a hint of sweetness and help with browning. For a savory crust, you can leave it out. A teaspoon of vinegar or lemon juice is sometimes used in pastry dough, but it is not required for this basic recipe.
Sugar
Add 1 to 2 teaspoons for a lightly sweet crust. It is optional.
Vinegar or lemon juice
If desired, replace a small part of the water with it. Do not expect it to fix dough that has been overmixed.
How to Make Pie Crust in a Food Processor
The best method is to pulse the dry ingredients and butter, then add cold water in small amounts. Do not run the motor continuously for long periods. Short pulses give you more control over the texture and help keep the butter from warming too much.
Source: www.pinterest.com
Step 1: Chill the butter and prepare the water
Cut the butter into cubes about 1/2 inch wide. Place them in the refrigerator while you measure the flour and salt. Add ice to a small bowl of water and let it cool well before you start.
Cold butter is easier to keep in small pieces during mixing. Those pieces help create a flaky texture as the crust bakes. If your kitchen is warm, chill the food processor bowl and blade briefly as well.
Look for firm butter
The cubes should hold their shape when you pick them up. Soft or greasy butter can blend too fully into the flour.
Step 2: Pulse the flour and salt
Fit the metal blade into the processor bowl. Add the flour and salt, then pulse three or four times to mix them. This spreads the salt through the flour before the butter goes in.
Do not pack the flour
Loose, evenly measured flour helps keep the recipe consistent. If you use a kitchen scale, weigh the flour according to the conversion you normally use for your flour brand.
Step 3: Add the cold butter
Scatter the butter cubes over the flour. Pulse in short bursts, checking the mixture after each few pulses. Stop when the flour contains a mix of coarse crumbs and small butter pieces, with some bits about the size of peas.
The mixture does not need to look perfectly even. A few larger butter pieces are useful. If the whole mixture turns into a fine, sandy powder, the crust may have less distinct flaky layers.
Watch the texture
The mixture should look crumbly rather than creamy. Avoid running the machine until the butter disappears completely.
Step 4: Add ice water slowly
Pour in about 6 tablespoons of ice water, spreading it across the mixture. Pulse a few times, then check the dough. If much of the flour remains loose and the mixture will not hold together when pressed, add another tablespoon of water.
Continue in small amounts until the dough begins to form moist clumps. You may need 6 to 8 tablespoons in total, depending on the flour, humidity, and how the ingredients were measured. Stop as soon as the dough can hold together when squeezed.
Do not wait for a dough ball
The mixture may still look crumbly in the processor bowl. That is fine if a small handful holds together when pressed.
Step 5: Bring the dough together by hand
Turn the mixture onto a clean work surface. Gather it gently with your hands and press the loose crumbs together. Avoid kneading it like bread dough, since too much handling can develop gluten and make the crust tough.
Divide the dough into two equal portions. Shape each portion into a flat disk about 1 inch thick. A disk chills more evenly and is easier to roll than a thick ball.
For a double-crust pie
Make one disk slightly larger than the other if you want extra dough for the bottom crust. Keep both portions covered.
Step 6: Wrap and chill
Wrap each disk tightly and refrigerate it for at least 1 hour. This gives the flour time to absorb moisture and lets the butter firm up again. The dough should feel cool and firm, but it should still bend enough to roll without cracking badly.
If you plan to bake another day, keep the wrapped dough chilled and use it within about 2 days for best handling. For longer storage, freeze it in a well-sealed freezer-safe bag or container.
If the dough becomes very firm
Let it sit at room temperature for about 5 to 10 minutes before rolling. The exact time depends on the temperature of your kitchen and refrigerator.
Step 7: Roll and fit the crust
Lightly flour the work surface and rolling pin. Place one disk in the center and roll from the middle outward. Turn the dough a quarter turn now and then to help keep it round. Add only a little flour when it begins to stick.
For a standard 9-inch pie plate, roll the dough into a circle about 12 inches wide. This gives you room to line the plate and leave an edge for trimming or crimping. Transfer the dough by folding it gently into quarters or rolling it around the pin.
Set the dough into the pie plate without stretching it. Lift the edges slightly and let the pastry settle into the bottom and sides. Trim or fold the extra dough as your recipe requires.
Avoid stretching
Stretched pastry can pull back in the oven. Fit it into the plate with gentle pressure rather than pulling it to reach the edges.
Why Cold Ingredients Matter
Cold butter helps the crust hold its shape and form a flaky texture. During baking, pieces of butter melt and release moisture as steam. This helps separate parts of the dough, while the flour structure sets in the oven.
Warm butter can blend too fully into the flour before the crust reaches the oven. That may lead to a more compact texture and make the dough harder to handle. Cold water also helps limit early warming while you mix.
Source: homecookingmemories.com
How cold should the butter be?
The butter should be firm but easy to cut. It should not be melted, oily, or soft enough to smear across the cutting board. If the butter starts to soften during prep, return it to the refrigerator for a short time.
Warm kitchen
Work in short stages and chill the dough if it becomes sticky or greasy.
Cold kitchen
Let the dough rest briefly before rolling if it cracks because it is too firm.
Can you use frozen butter?
Very cold butter can work, but hard frozen chunks may not process evenly in every machine. Cut the butter into small pieces before freezing, and follow the food processor manual. If the motor struggles or the blade stops moving, switch the machine off and unplug it before checking the bowl.
Best everyday choice
Cold butter from the refrigerator is easy to cut, measure, and process in short pulses.
How to Tell When the Dough Is Ready
The dough is ready when a handful holds together after a gentle squeeze. It may still look rough, with a few visible butter pieces and small dry crumbs. You do not need a smooth ball inside the food processor.
Source: kingarthurbaking.com
Signs of good pie dough
Good dough feels cool and slightly firm. When you press it, it stays together without leaving wet paste on your fingers. The surface may have small cracks at the edges, but it should not fall apart into loose flour.
It clumps when squeezed
This is the best quick test before you remove the dough from the bowl.
Butter remains visible
Small pieces of butter are useful. The goal is not to blend every piece into the flour.
The dough is not sticky
A wet or greasy mass may need chilling and can indicate too much water or warm butter.
What if the dough looks too dry?
Add one teaspoon of ice water at a time and pulse briefly. Test the mixture again by squeezing a small handful. Do not pour in several tablespoons at once, since extra water is difficult to remove.
Dry crumbs remain loose
Add a small amount of water, pulse once or twice, and test again.
The dough cracks while rolling
Let it rest for a few minutes, then press the cracks together. If it remains dry and breaks apart, work in a tiny amount of water and chill it again.
What if the dough is too wet?
If the dough feels sticky, stop processing and chill it before adding more flour. Cold butter may firm up and make the dough easier to handle. If it is still wet after chilling, dust the work surface lightly with flour and use only what is needed to prevent sticking.
Food Processor Pie Crust Compared With Hand-Made Dough
A food processor saves time and makes it easy to cut butter into flour. It is useful when you want a quick, repeatable method or need to make more than one crust. Hand mixing gives you a closer feel for the texture, which some bakers prefer.
Neither method guarantees a better crust on its own. Cold ingredients, careful water control, limited mixing, and proper chilling matter more than the tool you use.
Source: everydaypie.com
Which method should you choose?
Use a food processor when you want to work quickly and have a machine with enough capacity for the recipe. Choose a pastry cutter or your fingertips if you want more direct control over the butter pieces or do not have a processor.
Food processor
Fast mixing with less hand effort, but it is easy to overprocess the dough if you run the motor too long.
Pastry cutter
Good control over butter size and useful for small kitchens without a food processor.
Hand mixing
Offers direct feedback, but the warmth of your hands can soften the butter during long mixing.
Can a blender replace a food processor?
A standard countertop blender is usually not the best tool for pie dough. Its narrow jar and blade design can make the mixture hard to process evenly and may encourage overmixing. A food processor has a wider work bowl that is better suited to this task.
If you do not own a food processor, a pastry cutter or two forks can work well. Mix the butter into the flour by hand, then add the water gradually and press the dough together.
Avoid forcing the machine
Do not use an appliance for a task that its manual does not support.
How to Bake a Food Processor Pie Crust
The correct baking method depends on the filling. Some pies use raw dough with the filling added before baking. Others need a partially baked or fully baked shell first. Follow the baking instructions for your specific pie rather than using one temperature and time for every filling.
For a double-crust fruit pie, fit the bottom crust into the plate, add the filling, then cover it with the top crust. Seal and crimp the edges, cut vents in the top, and bake according to the filling recipe. The vents let steam escape as the filling heats.
Source: theflyingkitchen.com
When to blind bake
Blind baking means baking the crust before adding the filling. It is often useful for custard pies, cream pies, and fillings that need less oven time than the pastry. Some recipes call for partial baking, while others require a fully baked shell.
Line the chilled crust
Place parchment paper or suitable baking paper over the pastry and fill it with pie weights or dry beans reserved for this purpose.
Bake with weights first
Use the temperature and timing in your chosen pie recipe. The weights help reduce puffing and shrinking.
Finish without weights if directed
Some recipes call for a short second bake to dry or brown the base. Remove the paper and weights carefully because they will be hot.
How to reduce a soggy bottom crust
A wet filling, underbaking, or a crust that was not prepared as directed can leave the base soft. Chill the fitted crust before baking and use a metal pie plate if you want a plate that heats quickly. A glass or ceramic plate can also work, but the baking time may differ.
For very wet fillings, use the blind-baking or thickening method called for in the recipe. Avoid adding extra flour to the crust as a quick fix, since that can make the pastry dense.
Check the bottom
Look for a set, browned crust rather than relying only on the color of the rim.
Let the pie cool
Fruit and custard fillings often need time to set before slicing. Cutting too soon can make the filling run.
Common Pie Crust Problems and How to Fix Them
Most pie dough problems come from too much water, too much mixing, warm butter, or dough that has not rested enough. Make one small change at a time so you can see what helps. The table below matches common signs with practical fixes.
Source: deporecipe.co
Troubleshooting guide
Use this guide while mixing or rolling. If the dough is already in the pie plate, focus on gentle repairs rather than trying to remake the texture completely.
Dough falls apart
It may need a little more water or a short rest. Add water in tiny amounts only if it will not hold together when squeezed.
Dough is sticky
It may contain too much water or warm butter. Chill it first, then use a light dusting of flour when rolling.
Crust feels tough
Too much water, overmixing, or rough handling may be the cause. Mix only until the dough clumps and handle it gently.
Crust shrinks in the oven
The dough may have been stretched or not rested enough. Fit it into the plate without pulling and chill it before baking.
Crust has little flake
The butter may have been too warm or processed too finely. Keep small butter pieces visible and avoid running the machine for too long.
Edges brown too fast
Cover the rim with a pie shield or strips of foil when needed, taking care not to block the filling or touch hot oven surfaces.
Can you fix dough that was overmixed?
You cannot fully reverse overmixing, but chilling can make the dough easier to handle. Shape it gently, wrap it, and let it rest in the refrigerator before rolling. Avoid adding more water or kneading it further unless the dough is truly too dry to hold together.
For the next batch
Use fewer pulses, check the butter pieces early, and stop once the dough holds together when pressed.
How to Store or Freeze Pie Dough
You can make pie dough ahead of time, which helps spread out the work before a holiday meal or weekend bake. Wrap each disk well to keep it from drying out or absorbing odors from other foods. Label the package with the date if you plan to freeze several batches.
Source: buybestkitchenware.com
Refrigerator storage
Keep wrapped dough in the refrigerator and use it within about 2 days for best results. If it becomes very firm, let it sit briefly before rolling. Do not leave raw dough at room temperature for long periods, especially in a warm kitchen.
Keep it covered
A tight wrap prevents the surface from drying and forming a hard skin.
Freezer storage
For longer storage, wrap the disks tightly and place them in a freezer-safe bag or sealed container. Use within about 3 months for good quality. Thaw the dough overnight in the refrigerator before rolling, rather than leaving it out until the butter becomes soft.
Freeze in useful portions
Separate the dough into single-crust disks before freezing so you only thaw what you need.
Avoid repeated thawing
Repeated temperature changes can affect texture and make the dough harder to handle.
Can you freeze a pie crust in the plate?
Yes, many unbaked crusts can be frozen in a suitable pie plate. Fit the dough into the plate, protect it well, and freeze it until firm. Check the filling recipe before baking from frozen, since the time and method may need to change.
Protect the edges
Wrap the crust so the rim does not break or dry out during storage.
Ways to Adapt This Basic Pie Crust
The same basic method can suit sweet and savory pies with a few small changes. Keep the fat and water balance in mind when changing ingredients. Large swaps can change the dough texture, so make one adjustment at a time.
Source: kingarthurbaking.com
For savory pies and quiche
Leave out the optional sugar and keep the salt level suited to the filling. This crust can work with vegetable quiche, chicken pot pie, and other savory dishes. Follow the filling recipe to decide whether to pre-bake the shell or add the filling to raw dough.
Season with care
Strong herbs or spices can change the flavor and color of the pastry. Add only a small amount at first.
For a sweeter dessert crust
Add a small amount of sugar if you want a lightly sweet taste. For pies with a very sweet filling, a plain crust may be enough. Keep the dough cold and follow the baking method for the dessert.
Avoid excess sugar
More sugar can change browning and texture, so do not increase it without adjusting the recipe.
Can you replace butter with shortening?
Shortening can make a tender crust and may be easier to handle because it stays firm over a wider temperature range. Butter adds a rich flavor and water that helps create steam during baking. A blend of butter and shortening is another option, but it will not have exactly the same flavor or texture as an all-butter crust.
For butter flavor
Use all butter or a butter-heavy blend.
For easier handling
A shortening blend may suit a warm kitchen, but keep the dough cool and follow the recipe’s fat measurements.
Frequently Asked Questions
Q
How long should I run a food processor for pie crust?
Use short pulses rather than running the machine continuously. Pulse the flour and salt a few times, then pulse the butter until the mix looks like coarse crumbs with small visible pieces. After adding water, pulse only until the mixture begins to clump.
Q
Why is my food processor pie dough crumbly?
The dough may need a little more water, or the flour may not have absorbed enough moisture yet. Squeeze a small handful before adding anything. If it will not hold together, add one teaspoon of ice water, pulse briefly, and test again.
Q
Do I need to chill pie dough before rolling?
Yes, chilling is strongly recommended. It firms the butter and gives the flour time to absorb water. A rest of at least 1 hour makes the dough easier to roll and may help reduce shrinkage during baking.
Q
Can I make food processor pie crust the night before?
Yes. Shape the dough into disks, wrap them tightly, and refrigerate them overnight. Let the dough sit briefly at room temperature if it is too firm to roll, but do not let the butter become soft.
Q
Should I use the metal blade or a dough blade?
For a standard food processor pie crust, the metal S-shaped blade is commonly used to cut butter into flour. Use the attachment recommended by your appliance manual, and avoid overprocessing the dough.
Q
Can I use this recipe for a pumpkin pie?
Yes. This crust can be used for pumpkin pie, but follow the pumpkin pie recipe to determine whether the shell should be partially baked first. Custard-style fillings can make the bottom crust soft if the pastry is not baked as directed.
✦ Wrapping Up
Conclusion
A pie crust recipe for food processor can save time and reduce the effort needed to make homemade pastry. The basic mix uses flour, cold butter, salt, and ice water. Short pulses and careful water control help keep the dough tender and easier to roll.
Give the dough time to chill before you shape it in the pie plate. Use the baking method that fits your filling, whether you are making apple pie, pumpkin pie, quiche, or chicken pot pie. If the first batch feels too dry or sticky, small changes can help you get better results next time.
💡 Key Takeaway
Measure the flour, chill the butter, and keep ice water ready before you start. Pulse only until the dough clumps when pressed, then shape it into disks and chill for at least 1 hour before rolling.