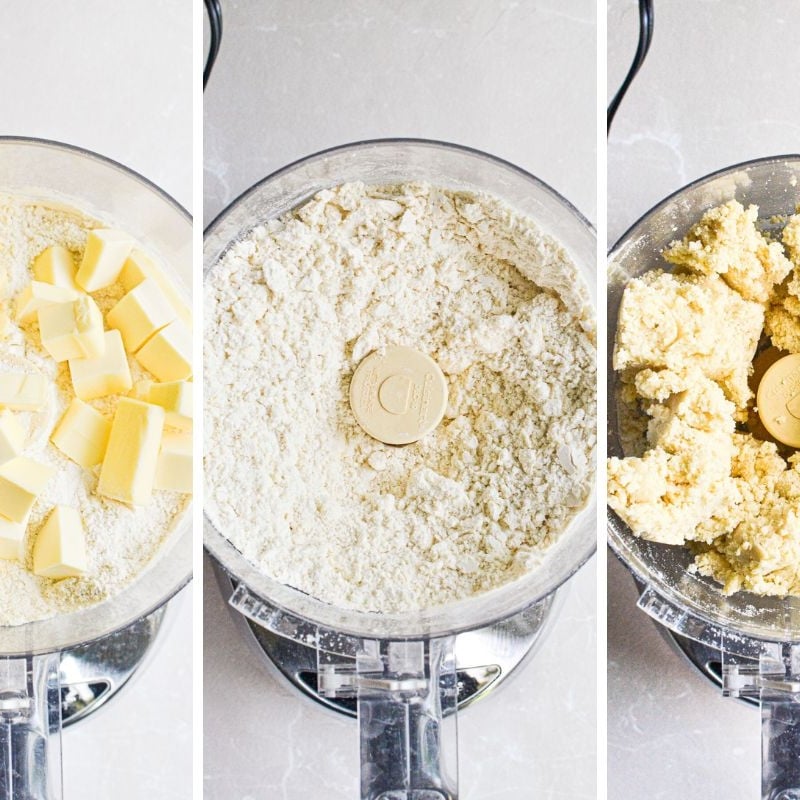
A pie crust recipe using a food processor needs flour, cold butter, salt, and ice water. Pulse the flour and butter until the mix looks like coarse crumbs with small butter bits. Add cold water a little at a time, then stop as soon as the dough starts to clump. Chill it before rolling for a tender, flaky crust.
Homemade pie crust is a useful skill for American home cooks. It works for apple pie at Thanksgiving, pumpkin pie in the fall, and fresh berry pie in summer. A food processor makes the first steps quick and cuts the butter into the flour with little effort. You also avoid a lot of mess on the counter.
The main trick is to keep the butter cold and avoid mixing the dough too much. Small pieces of butter help form flaky layers as the crust bakes. Too much water or too much mixing can make the crust firm and hard to roll. This guide covers the ingredients, the right pulse method, chilling, rolling, and common fixes.
This recipe makes one standard 9-inch pie crust. It suits a single-crust pie, such as pumpkin pie or a custard pie. For a covered pie with both a bottom and top crust, double the recipe or prepare two batches. A food processor with a standard metal chopping blade works well for this method.
The recipe uses all-purpose flour and unsalted butter. The result is a rich, buttery crust that works with sweet or savory fillings. Keep the ingredients cold and measure the flour with care. Add water slowly because the amount needed can change with the flour and room conditions.
Source: everydaypie.com
Prep time
About 15 minutes of active work, plus at least 1 hour of chilling time.
Yield
One 9-inch pie crust.
Main tool
A food processor fitted with its metal chopping blade.
Best result
A cool, pliable dough with small visible pieces of butter and no dry flour pockets.
Ingredients
Measure the ingredients before you start. Cut the butter into small cubes and keep it in the fridge until needed. Fill a small cup with ice water, but measure only the water you add to the dough.
1 1/4 cups all-purpose flour
Measure by spooning flour into the cup and leveling the top, or use about 156 grams by weight.
1/2 cup cold unsalted butter
Use 1 stick, or 113 grams, cut into small cubes.
1/2 teaspoon fine salt
Add a little less if you use salted butter.
3 to 5 tablespoons ice water
Start with 3 tablespoons and add more only as needed.
Optional sugar
Add 1 teaspoon for a slightly sweeter crust. Sugar is not required for a good pie shell.
Equipment You Need
A food processor does most of the mixing. You will also need a measuring cup or kitchen scale, a small bowl of ice water, plastic wrap or a reusable dough cover, a rolling pin, and a 9-inch pie plate. A bench scraper can help move the dough without pulling it apart.
A large processor bowl gives the ingredients room to move. If your machine is small, make two batches for a double crust instead of forcing too much dough into the bowl. Always fit the blade and lid as directed in the appliance manual.
Food processor
Use the standard metal blade, not a slicing or shredding disc.
Rolling pin
A straight or tapered pin can work. Use whichever lets you roll the dough evenly.
Pie plate
A standard 9-inch plate is suitable for this recipe. Deep-dish pies may need more dough.
How to Make Pie Crust in a Food Processor
The best method is to pulse the ingredients in stages. Short bursts give you more control than running the motor without a break. Watch the texture as you work because the dough can change from loose crumbs to an overmixed paste quite fast.
Do not wait for the dough to form a smooth ball inside the machine. Pie dough should look rough when it is ready to come out. A few small cracks and visible butter pieces are normal at this stage.
Source: i.pinimg.com
Step 1: Combine the dry ingredients
Place the flour, salt, and optional sugar in the processor bowl. Pulse two or three times to mix them evenly.
Step 2: Add the cold butter
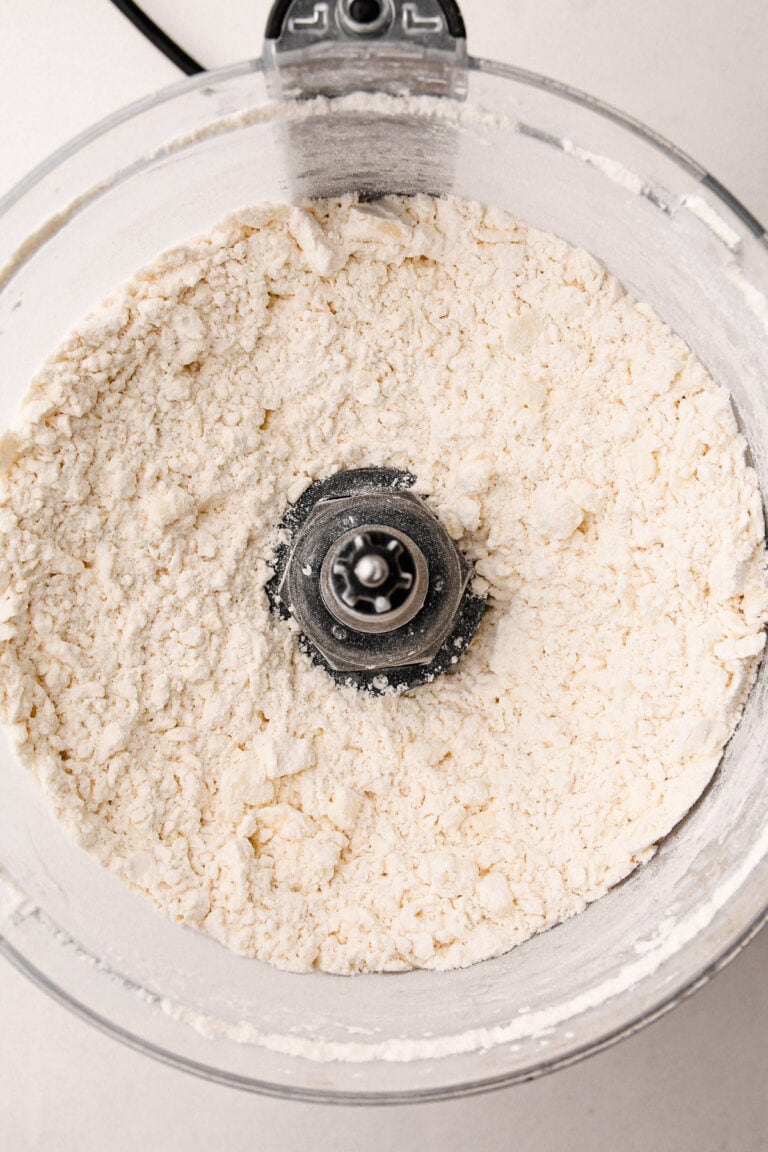
Scatter the cold butter cubes over the flour. Pulse in short bursts until the mixture looks like coarse crumbs with some pea-size butter pieces. Stop before the mixture turns into a uniform paste.
Step 3: Add ice water
Pour in 3 tablespoons of ice water through the feed tube or around the bowl. Pulse a few times. Check the texture before adding more water.
Step 4: Check the dough
Pinch a small amount between your fingers. If it holds together without crumbling apart, it has enough water. If it remains dry and loose, add water 1 teaspoon at a time and pulse briefly.
Step 5: Bring the dough together
Turn the mixture onto a clean counter. Press the loose crumbs together with your hands. Use only enough pressure to form a cohesive dough.
Step 6: Shape and wrap
Flatten the dough into a disk about 1 inch thick. Wrap it well so the surface does not dry out. A flat disk chills more evenly and is easier to roll later.
Step 7: Chill before rolling
Refrigerate the wrapped dough for at least 1 hour. If it feels very soft or warm, give it more time until it is firm but still pliable.
What the Dough Should Look Like
Before adding water, the flour and butter should look like coarse crumbs. Some pieces may be smaller than peas, while others can be larger. The mixture does not need to look perfectly even.
After adding water, the crumbs should start to stick when pressed. The dough may still look rough in the bowl. That is fine because the final shaping happens by hand.
Too dry
The crumbs fall apart when squeezed and refuse to hold their shape. Add a small amount of ice water.
Ready
The mixture forms clumps when pressed and leaves no large pockets of dry flour.
Too wet or overmixed
The dough looks greasy, sticky, or smooth and dense. Stop processing and chill it before handling further.
Why Short Pulses Matter
Pulsing gives the butter time to stay in small pieces rather than blend fully into the flour. When the crust bakes, these pieces can help create a tender, layered texture. The water also starts to bind the flour, so extra processing can make the dough tougher.
Food processors vary in power and bowl size. There is no exact pulse count that works for every machine. Use the look and feel of the mixture as your guide.
Use short bursts
Pulse briefly, then inspect the mixture. Repeat only when needed.
Avoid a smooth dough ball
The dough does not need to form a ball around the blade to be ready.
Why Cold Ingredients Make a Better Crust
Cold butter helps the dough keep its structure during mixing and rolling. If the butter gets too warm, it can coat more of the flour and make the mixture greasy. A warm dough may also soften too much while you shape the pie shell.
Ice water keeps the dough cool while helping the flour bind. Add only the amount needed to make the crumbs hold together. More water does not automatically make the crust better, and excess water can make it firm after baking.
Source: i.pinimg.com
Chill the butter
Keep it in the fridge until you are ready to add it to the flour.
Use ice water
Keep ice in the cup, but pour only the water into the processor.
Work on a cool surface
If your kitchen is warm, work quickly and return the dough to the fridge when it softens.
Chill the shaped shell when needed
If the dough becomes soft after fitting it into the pie plate, refrigerate the shell before baking.
Can You Use Frozen Butter?
Very cold butter is useful, but rock-hard frozen butter may be harder for some food processors to cut evenly. Small cubes of refrigerated butter are usually easier to control. If you use frozen butter, cut it into pieces that your machine can handle and follow its instructions.
Practical choice
Use cold butter from the fridge for a simple, repeatable method.
How to Roll and Shape the Pie Dough
After chilling, let the dough sit at room temperature for a few minutes if it feels too hard to roll. Place it on a lightly floured counter and dust the rolling pin with a small amount of flour. Roll from the center outward, turning the dough often to keep it from sticking.
Aim for an even round that is about 12 inches wide for a standard 9-inch pie plate. This gives enough dough to cover the bottom and sides with some extra for the edge. The exact size may vary with the depth and shape of your plate.
Source: i.pinimg.com
Start in the center
Roll outward with gentle, even pressure. Avoid pressing only on the edges.
Turn the dough often
Rotate it a little after each few rolls. Add a light dusting of flour if it begins to stick.
Move the dough carefully
Loosely roll it around the pin or fold it in half to transfer it to the pie plate.
Fit without stretching
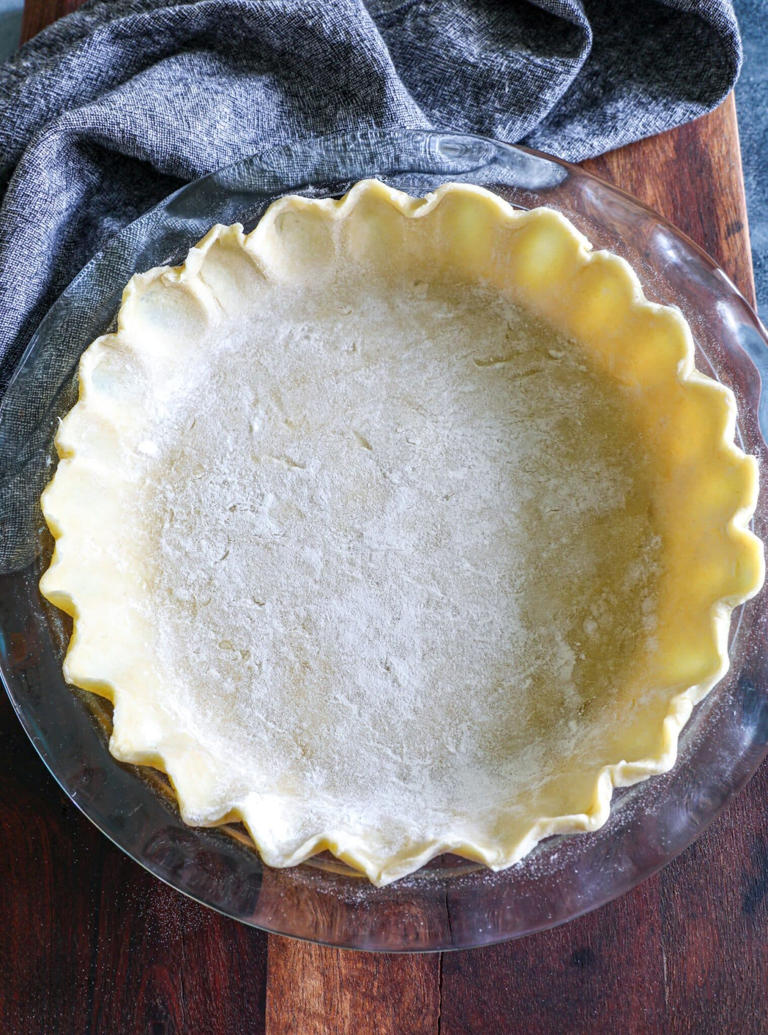
Lift the dough and let it settle into the bottom and corners. Do not pull it tight over the rim.
Trim and crimp
Leave a small overhang, trim the excess, then fold or crimp the edge as desired.
How to Stop the Dough From Cracking
Small edge cracks are common when chilled dough is rolled. Press them together with your fingers before continuing. If the dough breaks in a large area, let it warm slightly so it bends without snapping.
If the dough becomes sticky or greasy, stop rolling and chill it again. Adding lots of flour can make the baked crust dry. A short rest in the fridge often solves the problem with less effort.
For small cracks
Press the edges together and continue with gentle rolls.
For stiff dough
Wait a few minutes at room temperature, then try again.
For soft dough
Wrap it and chill until firm enough to handle.
Should You Grease the Pie Plate?
Most standard pie plates do not need to be greased for a butter crust. The butter in the dough provides fat, and extra grease can affect how the crust sits in the plate. Follow a specific recipe if it calls for a prepared pan.
Standard glass or metal plate
Usually use it clean and dry unless your recipe says otherwise.
Should You Blind Bake the Crust?
Blind baking means baking a pie shell before adding its filling. Some pies need this step, while others bake best with raw dough and filling together. The right method depends on the filling and the recipe you plan to follow.
Pumpkin pie and many fruit pies usually bake with their fillings inside the unbaked crust. Cream pies and some custard pies may need a fully or partly baked shell. Check the filling recipe before you start because baking times and temperatures differ.
Source: i.pinimg.com
For a fully baked shell
Line the chilled crust with parchment paper or foil, then fill it with pie weights or suitable dry beans. Bake according to your chosen recipe until the crust is set, then remove the weights and finish browning as directed.
For a partly baked shell
Bake the crust with weights until it begins to set. Remove the weights if the recipe directs, then continue for the stated time before adding the filling.
For a filled pie baked from raw dough
Add the filling and bake using the recipe’s stated temperature and timing. Do not blind bake unless the recipe calls for it.
How to Reduce a Soggy Bottom
A soggy bottom can happen when a wet filling releases liquid before the crust has time to bake through. Chilling the shell, following the right baking method, and using the correct oven temperature can help. A metal pie plate may also brown the base differently from a thick ceramic or glass plate.
For a fruit pie, follow the filling recipe’s advice on thickener and venting. For a custard or cream pie, use the crust preparation method specified in that recipe. There is no single bake time that suits every pie.
Keep the shell cold
Chill the shaped crust before baking if it has softened during handling.
Use the right bake method
Blind bake when the filling requires a pre-baked shell.
Avoid guessing the oven time
Follow the recipe for the full pie, including any changes for your pie plate.
Common Pie Crust Problems and How to Fix Them
Most pie crust problems come from dough that is too dry, too wet, too warm, or overworked. Check the dough at each stage instead of trying to fix everything after baking. Small changes early on can save the crust.
Source: img-s-msn-com.akamaized.net
The dough falls apart
It may need a little more water. Add ice water 1 teaspoon at a time, then press the dough to check whether it holds together.
The dough feels sticky
It may contain too much water or have warmed up. Wrap it and chill it before adding more flour.
The crust is tough
Too much water, excessive processing, or rough handling may have developed too much gluten. Use short pulses and a light touch next time.
The crust shrinks in the oven
Stretching the dough to fit the plate or skipping a rest can contribute to shrinkage. Fit the dough loosely and chill the shell before baking.
The crust looks pale
It may need more baking time, depending on the recipe and pie plate. Follow the stated bake method and look for the color and texture described in the recipe.
The crust is greasy
The butter may have softened or melted during mixing. Chill the dough before rolling and work in a cooler space if possible.
Can You Fix Dough That Has Been Overmixed?
You cannot fully reverse gluten development once it has happened. Chilling the dough may make it easier to handle, though it will not restore the texture of dough that was mixed correctly. Roll it gently and avoid adding more water or repeatedly kneading it.
The next batch can improve with shorter pulses and earlier checks. Stop when the dough begins to clump rather than waiting for a smooth ball.
For the current batch
Chill it, handle it gently, and use it rather than throwing it away.
For the next batch
Check the mixture after each short pulse and stop as soon as it holds together.
Butter, Shortening, or Both: Which Works Best?
Butter gives pie crust a rich flavor and helps form a flaky texture when small pieces remain in the dough. Shortening can make dough easier to handle and may help create a tender crust, but it does not offer the same buttery taste. A blend of the two can balance flavor and texture.
This recipe uses all butter because it is simple and works for many common pies. You can use a different fat, but the dough may need a different amount of water or a slightly different handling method. Follow a tested recipe if you change the fat or proportions.
Source: risasfamilykitchen.com
All-butter crust
A good fit when flavor matters and you want a classic homemade pastry.
Shortening crust
May be easier to shape in some recipes and can suit cooks who prefer a less buttery flavor.
Butter and shortening
Offers a middle ground, with butter flavor and some of shortening’s handling qualities.
Can You Use Margarine?
Margarine products vary in fat and water content, so they do not always behave like butter. A spreadable tub product may contain more water than a firm baking stick. If you want to use margarine, choose a product intended for baking and use a recipe designed for it.
Best practice
Avoid swapping fats by volume without checking their composition and the recipe’s instructions.
How to Store Homemade Pie Dough
You can make pie dough ahead of time, which helps spread out the work before a holiday meal or family dinner. Wrap it tightly to prevent drying and keep it away from foods with strong odors. Label the package with the date if you plan to store it for later use.
For short-term storage, refrigerate the dough and use it within a few days. For longer storage, freeze it in a well-sealed freezer-safe wrap or container. Thaw frozen dough in the refrigerator before rolling, then let it soften just enough to become workable.
Source: i.pinimg.com
Refrigerator
Keep the dough tightly wrapped and use it within about 2 to 3 days for best quality.
Freezer
Freeze the wrapped dough for longer storage. For best quality, aim to use it within about 3 months.
Thawing
Move frozen dough to the refrigerator and allow it to thaw slowly before rolling.
Baked crust
Cool a baked shell fully before storing it in a suitable covered container. Follow the filling recipe’s storage rules for pies that contain eggs, dairy, or other perishable ingredients.
Can You Freeze a Pie Crust in the Pie Plate?
Yes, if your pie plate and freezer setup allow it. Fit the dough into the plate, shape the edge, and wrap the shell well to prevent freezer odors and drying. Check that the plate is freezer-safe and follow the recipe’s directions for baking from frozen or thawing first.
Prevent damage
Avoid moving a fragile frozen glass dish directly into a hot oven unless the dish maker confirms it is safe for that temperature change.
Ways to Use This Homemade Pie Crust
This all-butter dough can be used for many sweet and savory pies. The filling and baking method determine whether you need a single crust, a top crust, or a pre-baked shell. Keep the dough cold and adjust the batch size to match the pie plate.
Source: theviewfromgreatisland.com
Apple pie
Make a double batch for a bottom crust and top crust. Cut vents in the top so steam can escape.
Pumpkin pie
Use a single crust and follow the filling recipe for whether to blind bake the shell.
Pecan pie
A single crust usually works for a standard pie plate. Follow the filling recipe’s baking directions.
Chicken pot pie
Use the dough for a bottom crust, top crust, or both, depending on the recipe.
Quiche
A single crust works well in many quiche recipes. Blind baking may help prevent a wet base.
Fresh fruit pie
Choose a recipe that accounts for the water released by the fruit and the need for the filling to set.
How to Make a Double Pie Crust
For a double crust, double the ingredient amounts and make two batches if your processor cannot mix the full quantity with room to spare. Shape each batch into a separate disk, wrap it, and chill it. Roll one disk for the base and the other for the top.
Avoid packing too much dough into a small processor bowl. Crowding can lead to uneven mixing and force you to process the dough longer than needed. Separate batches make it easier to check the texture.
Bottom crust
Roll it large enough to cover the base and sides with a little overhang.
Top crust
Roll a second disk to cover the filling, then cut vents or use a suitable lattice pattern.
Seal the edges
Trim, press the top and bottom edges together, and crimp them before baking.
Frequently Asked Questions
Q
Can I make pie crust in a food processor without a dough blade?
Yes. A standard metal chopping blade is suitable for this method. The dough does not need a special dough blade, though you should follow your processor’s manual and avoid overfilling the bowl.
Q
How long should I run the food processor for pie dough?
Use short pulses and check the mixture often. The total time depends on the machine, the size of the butter pieces, and the amount of water. Stop when the dough begins to clump and holds together when pressed.
Q
Why is my food processor pie dough crumbly?
The dough may need a little more water, or the crumbs may not have been pressed together yet. Pinch a small portion first. If it falls apart, add ice water 1 teaspoon at a time and pulse briefly until the mixture holds together.
Q
How long should pie dough chill before rolling?
Chill the dough for at least 1 hour for this recipe. It should feel firm but still bend without breaking. If it becomes very hard in the fridge, leave it at room temperature for a few minutes before rolling.
Q
Can I make food processor pie crust the day before?
Yes. Wrap the dough tightly and refrigerate it for about 2 to 3 days for best quality. If you need more time, freeze it and thaw it in the refrigerator before rolling.
Q
Should I use cold or room-temperature butter for pie crust?
Use cold butter straight from the refrigerator. Cold butter is easier to keep in small pieces during processing and helps the dough stay firm while you work. Soft butter can make the mixture greasy and harder to handle.
Q
Can I use this recipe for a savory pie?
Yes. The basic dough works for pot pies, quiche, and other savory bakes. Leave out the optional sugar if you prefer a neutral flavor, and follow the filling recipe for blind baking and oven time.
✦ Wrapping Up
Conclusion
A pie crust recipe using a food processor is simple once you learn what the dough should look like. Cold butter, a small amount of ice water, and short pulses help create a dough that is easy to shape. The mixture should hold together when pressed, but it does not need to look smooth in the processor.
Give the dough time to chill before rolling. Handle it gently, avoid stretching it into the pie plate, and use the baking method that suits your filling. These small steps can help you make a homemade crust for holiday pies, fruit desserts, quiche, and savory family meals.
💡 Key Takeaway
Measure the flour, chill the butter, and prepare ice water before you begin. Pulse in short bursts, add water slowly, shape the dough into a disk, and chill it for at least 1 hour before rolling.