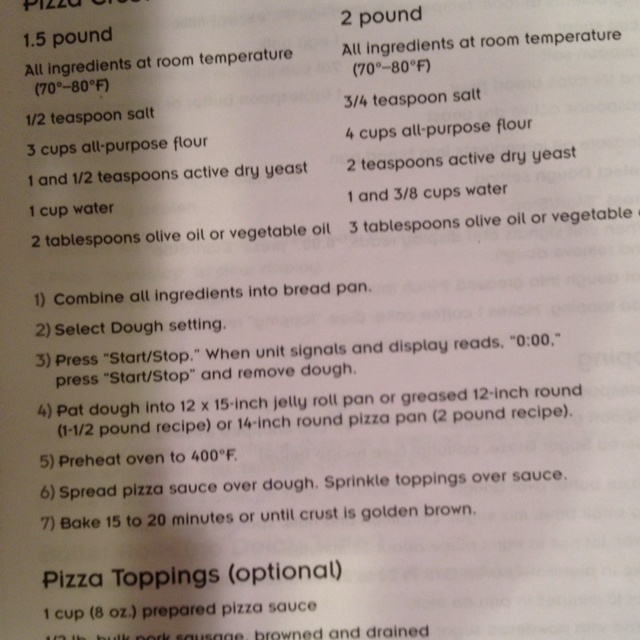
An Oster bread maker can mix and knead pizza dough for you. Add the ingredients in the order listed in your manual, select the Dough cycle, and let the machine do the work. Shape the finished dough, add your toppings, and bake the pizza in a hot oven.
Homemade pizza is a favorite for many American families, from Friday night dinners in California to game-day meals in the Midwest. Making dough at home gives you more control over the crust, toppings, and size of each pizza. An Oster bread maker can take much of the mixing and kneading work off your hands, which makes the process easier for busy home cooks.
This Oster bread maker pizza dough recipe uses common ingredients such as bread flour, water, yeast, olive oil, salt, and a little sugar. The machine helps bring them together into a smooth dough, but your flour, room temperature, yeast, and machine model can affect the result. The recipe below is a practical starting point, not a claim that every Oster model uses the same settings or ingredient order.
The main goal is simple: make dough that feels soft, stretches without tearing too easily, and bakes into a crust that suits your taste. You can use it for thin pizza, a thicker pan crust, or small personal pizzas. With a few basic checks, you can also fix common problems such as sticky dough, a dry ball, or a crust that turns out too tough.
This recipe makes about two medium pizzas, depending on how thick you stretch the dough. The exact yield will vary with the size and thickness of each crust. It is designed for a typical home bread maker that supports a Dough cycle, but you should check your machine’s manual before adding the full batch.
The ingredient amounts below give you a useful starting point. Bread flour tends to make a chewy crust, while all-purpose flour can give you a softer bite. Both can work, so use the flour you have and adjust the water only when the dough needs it.
Source: ca.pinterest.com
Bread flour
3 cups, measured carefully. It helps create a chewy crust because it generally contains more protein than all-purpose flour.
Water
1 cup of lukewarm water. Aim for water that feels mildly warm, not hot. Very hot water can harm the yeast.
Olive oil
2 tablespoons. The oil adds tenderness and helps the dough handle more easily.
Sugar
1 tablespoon. This adds a little sweetness and gives the yeast an easy source of food.
Salt
1 teaspoon. Salt adds flavor and affects how the dough develops.
Bread machine yeast
2 teaspoons. Use fresh yeast and follow its package guidance. Instant yeast made for bread machines is a convenient option.
Ingredients at a Glance
The flour and water form the base of the dough. Oil helps keep it tender, salt brings out the flavor, and yeast creates gas that helps the dough rise. Sugar is optional in some pizza dough recipes, but this version includes a small amount for a balanced flavor.
For a more precise result, weigh the flour if you own a kitchen scale. Cups can hold different amounts of flour depending on how tightly you pack them. If you use cups, spoon the flour into the cup and level the top instead of pressing it down.
For a crisp crust
Use a thin layer of toppings and bake on a preheated pizza stone or steel when available.
For a softer crust
Shape the dough a little thicker and bake it on a lightly oiled pan.
For whole wheat dough
Replace part of the bread flour with whole wheat flour. The dough may need a little more water, so check its texture during kneading.
Check Your Oster Model Before Starting
Oster has made different bread maker models over time. Their controls, loaf capacities, ingredient dispensers, and cycle names can vary. Use the Dough cycle only if your model supports it, and do not assume that a recipe intended for a large machine will fit a smaller one.
Follow the manual for ingredient order and capacity. If the manual calls for liquids first, add the water and oil before the dry ingredients. If it gives a different sequence, use that sequence instead. Keep yeast separate from liquid until the cycle starts when your manual instructs you to do so.
Check the pan capacity
Make sure the batch fits the bread pan and stays within the maximum flour or dough limit listed in the manual.
Check the cycle
Choose Dough or the matching dough-only setting. Do not select a full bread cycle unless your manual specifically supports the intended use.
How to Make Pizza Dough in an Oster Bread Maker
The bread maker handles most of the mixing and kneading, so your main job is to measure the ingredients and watch the dough during the early part of the cycle. A quick texture check can help you spot a problem before the machine finishes.
Keep your hands and utensils clear of the moving kneading paddle. Do not reach into the pan while the machine is running. If you need to adjust the dough, pause the machine according to the manual before opening or handling the pan.
Source: banana-breads.com
Step 1: Measure the ingredients
Measure the flour, water, oil, sugar, salt, and yeast. Keep the measurements level and consistent.
Step 2: Add ingredients in the correct order
Follow your Oster manual. Many bread makers use liquids first, then flour and other dry ingredients, with yeast placed last or in a separate well. The manual for your model takes priority.
Step 3: Select the Dough cycle
Close the lid and choose the dough setting listed in your manual. Start the cycle and allow the machine to mix and knead.
Step 4: Check the dough early
When the ingredients have begun to combine, look for a soft, cohesive ball. If the dough is very wet and smears across the pan, add flour one tablespoon at a time. If it looks dry and breaks into rough pieces, add water one teaspoon at a time.
Step 5: Let the cycle finish
Allow the machine to complete the Dough cycle. Depending on the model, this may include mixing, kneading, and a period of rest or rise.
Step 6: Remove the dough
When the cycle ends, switch off the machine as directed and remove the pan carefully. Use a suitable utensil to release the dough if needed, and watch for the kneading paddle.
Step 7: Rest and shape
Place the dough on a lightly floured surface. Divide it into two portions, cover them, and let them rest for about 10 to 15 minutes if they resist stretching.
What the Dough Should Look Like
During kneading, the dough should come together rather than remain a loose pool of batter or a pile of dry crumbs. It may touch the sides of the pan at times, but it should become more cohesive as kneading continues. A small amount of tackiness is normal.
After the cycle, the dough should feel soft and stretchy. It does not need to look perfectly smooth to make good pizza. If your bread maker includes a rise period, the dough may look fuller and feel lighter when it is ready.
Too sticky
Add flour in small amounts and wait for it to mix in before adding more.
Too stiff
Add a little water at a time and give the machine time to absorb it.
Tearing during shaping
Cover the dough and let it rest for another 10 minutes before trying again.
How Long Does the Dough Cycle Take?
The cycle time depends on your Oster model and its programmed settings. Some machines mix, knead, and rest the dough in one cycle, while others use different timings. Check the manual for the cycle length rather than relying on a time from another model.
The clock is only part of the process. Dough texture and temperature also affect readiness. If the dough is not relaxed enough to shape, a short covered rest can help even after the machine has finished.
Do not rush the cycle
Let the programmed mixing and kneading stages finish unless the manual or a clear machine problem requires you to stop.
Judge the dough by its texture
Look for a cohesive, stretchy dough rather than relying only on the amount of time that has passed.
Shape the Dough and Prepare Your Pizza
Once the dough is ready, shape it on a clean work surface. A little flour can stop sticking, but too much flour can make the crust dry. Use only what you need to move and stretch the dough with ease.
This recipe works with tomato sauce, cheese, vegetables, cooked meat, and many other toppings. The best results usually come from keeping the topping layer moderate so the center can cook through before the edges become too dark.
Source: foodiepost.com
Divide the dough
Cut the dough into two equal portions for medium pizzas, or make smaller portions for personal pizzas.
Rest if needed
Cover the dough and let it rest for 10 to 15 minutes if it springs back as you stretch it.
Shape the crust
Press from the center toward the edges, leaving a slightly thicker rim if you like a raised crust.
Add toppings
Spread a thin layer of sauce, add cheese, and arrange the toppings without piling them too high.
Choose a Thin, Medium, or Thick Crust
The thickness of the dough changes the texture and baking time. A thin crust usually becomes crisp more quickly, while a thick crust needs more time for the center to cook. Shape the dough to suit your pan and oven instead of forcing every batch into the same size.
If you prefer a pan pizza, lightly oil the pan and press the dough into it. Let it rest briefly if it keeps pulling away from the edges. For a thinner pizza, stretch it gradually and avoid making the center so thin that it tears.
Thin crust
Stretch the dough into a broad, thin round and use fewer wet toppings.
Medium crust
Keep the center even and leave a small rim around the edge.
Thick or pan crust
Press the dough into an oiled pan and allow extra baking time as needed.
Which Toppings Work Well?
Classic toppings include pizza sauce, mozzarella, mushrooms, bell peppers, onions, olives, and cooked sausage. You can also use cooked chicken, spinach, or roasted vegetables. Drain ingredients that release a lot of water before placing them on the dough.
Raw toppings with high moisture can make the middle soft. Fresh mozzarella, juicy tomatoes, and watery vegetables may need draining or a lighter hand. Cook raw meat before adding it unless the recipe and cooking method specifically ensure it reaches a safe internal temperature.
Classic cheese pizza
Use a light layer of tomato sauce and shredded mozzarella for a simple base.
Vegetable pizza
Use sliced peppers, onions, mushrooms, or other vegetables that have been drained or lightly cooked when needed.
Meat pizza
Use fully cooked sausage, chicken, or other meat so the toppings can heat through without leaving raw portions.
How to Bake Homemade Pizza in a Home Oven
A fully preheated oven helps the crust cook more evenly. Many home pizza recipes use temperatures around 450 to 500 degrees Fahrenheit, but your oven, pan, and dough thickness determine the best setting. Check the limits of your cookware and follow its care instructions before using high heat.
Start with the temperature recommended for your baking surface and oven. A pizza stone or steel can help transfer heat to the base, but a sturdy metal pan also works. If using a stone, place it in the oven before preheating and follow the manufacturer’s instructions for handling and cleaning.
Source: www.pinterest.com
Preheat the oven
Set the oven to a suitable pizza-baking temperature, often 450 to 500 degrees Fahrenheit, and allow enough time for it to heat fully.
Prepare the baking surface
Use a suitable pizza pan, baking sheet, stone, or steel. Avoid placing a cold stone into a hot oven unless its instructions allow it.
Transfer the pizza
Place the shaped and topped dough on the prepared surface, taking care not to spill toppings or touch hot cookware.
Bake until done
Begin checking after about 10 minutes, then continue as needed. Thin and thick crusts can take different amounts of time.
Check the base and edges
Look for a browned bottom, set crust, melted cheese, and hot toppings. Add a little more time if the center remains pale or doughy.
How to Tell When Pizza Is Done
Color is a useful first clue. The edge should look set and lightly browned, while the underside should have some color rather than remain pale and damp. Cheese should be melted, and the center should not look like raw dough.
Baking time is not a guarantee of doneness. Oven temperatures can vary, and a thick pizza with many toppings may need longer than a thin one. Use visual checks and allow extra time when the center has not cooked through.
The bottom is pale
Give the pizza more time, or use a suitable preheated baking surface for better heat transfer.
The top browns too fast
Reduce the oven temperature slightly if needed and continue baking until the center is cooked.
The middle stays soft
Reduce the amount of sauce and wet toppings on the next pizza, and make sure the oven is fully preheated.
Should You Prebake the Crust?
Prebaking means baking the shaped dough briefly before adding toppings. It can help when making a thick crust or when your oven struggles to cook the middle. It is not required for every pizza, and a thin crust may bake well with its toppings added from the start.
If you try prebaking, keep the first bake short and watch the dough closely. The aim is to set the surface, not fully brown the crust before the toppings go on. Add the toppings and return the pizza to the oven until it is cooked through.
Prebake when useful
Consider it for a thicker crust or a pizza that often stays wet in the center.
Skip it when unnecessary
A thin pizza on a hot baking surface may not need a separate first bake.
Tips for Better Oster Bread Maker Pizza Dough
A good dough starts with careful measuring, fresh yeast, and a sensible water level. You do not need special equipment beyond the bread maker, an oven, and a suitable baking pan. Small changes can make a clear difference in how the dough feels and how the crust bakes.
Keep a short note of what works in your kitchen. Flour brands absorb water differently, and a dry winter kitchen may behave differently from a warm, humid summer kitchen. A record of the flour, water, cycle, and baking temperature can help you repeat a good result.
Source: banana-breads.com
Use fresh yeast
Old or poorly stored yeast may not raise the dough well. Store it according to the package directions and check its date.
Measure water with care
Start with the recipe amount and adjust in small steps only after the flour begins to mix.
Avoid excess flour during shaping
Too much added flour can make the crust tough or dry. Use a light dusting on the work surface.
Give the dough time to relax
If it keeps shrinking, cover it and wait a few minutes before stretching it again.
Keep toppings balanced
A thinner layer of sauce and cheese helps the middle cook without becoming wet.
Can You Use All-Purpose Flour Instead of Bread Flour?
Yes. All-purpose flour can make pizza dough, although the crust may have a different chew and texture. Bread flour generally has more protein, which can support a stronger dough structure. All-purpose flour often makes a softer crust that is easier to bite.
Begin with the same amount by volume or, better, a similar flour weight. Check the dough as it mixes because the water it needs can vary by brand and storage conditions. Add small amounts of water or flour only when the texture shows that an adjustment is needed.
Bread flour
Useful when you want a chewy crust with more structure.
All-purpose flour
A practical option for a softer crust and common home baking.
Whole wheat flour
Adds a heartier flavor and can make the dough feel firmer. Start by replacing only part of the white flour.
Can You Make the Dough Ahead of Time?
Yes. You can make pizza dough ahead and keep it chilled for later use. Once the dough is ready, divide it into portions, place each portion in a lightly oiled, covered container, and refrigerate it promptly. Leave enough room for the dough to expand.
For best results, use the dough within a short refrigerated storage period, such as one to two days, and check its condition before shaping. Yeast may continue to work slowly in the refrigerator. If the dough smells unpleasant, shows mold, or has another clear sign of spoilage, discard it rather than trying to rescue it.
Before shaping, let chilled dough sit at room temperature for about 20 to 40 minutes if needed. The time can vary with the size of the dough ball and room temperature. Do not leave dough out for an extended period in a hot kitchen.
For next-day pizza
Refrigerate the dough in a covered container and let it soften enough to stretch before shaping.
For longer storage
Freeze individual dough portions in freezer-safe packaging. Thaw them in the refrigerator before use.
Troubleshooting Common Pizza Dough Problems
Most dough problems come from ingredient measurements, yeast activity, water level, or the time the dough spends resting. Start with the symptom you can see rather than changing several ingredients at once. Small corrections are easier to judge and help you learn how your machine behaves.
The bread maker manual remains the best source for model-specific cycle and loading instructions. If the machine makes an unusual grinding noise, stops unexpectedly, or shows signs of electrical trouble, stop using it and follow the manufacturer’s safety guidance rather than attempting a repair while it is connected to power.
Source: www.pinterest.com
Dough is too sticky
The flour may be absorbing less water than expected, or the dough may need more kneading. Wait briefly, then add flour one tablespoon at a time until the dough becomes cohesive.
Dough is too dry
The flour may have been packed into the measuring cup, or the flour may absorb more water. Add water one teaspoon at a time and let the machine mix it in.
Dough does not rise
Check the yeast date and storage, the water temperature, and whether the selected cycle includes a rise period. Very cold conditions can slow yeast activity.
Dough tears when stretched
The dough may need more rest, or it may be too dry. Cover it for 10 to 15 minutes and try again before adding more flour.
Crust is tough
Too much flour, overworking during shaping, or baking for too long can contribute. Measure more carefully and stretch the dough gently.
Pizza is soggy in the center
Use less sauce, drain wet toppings, preheat the oven fully, and consider a suitable hot baking surface.
Why Is the Dough Not Rising?
Yeast needs suitable conditions to work. If the water was too hot, the yeast may have been damaged. Yeast that is old or poorly stored may also be weak, while a cool room can slow the rise. Check the ingredients and the selected cycle before deciding the recipe needs a major change.
Some bread maker Dough cycles include a rest or rise period, but the exact program varies. If the cycle ends and the dough looks smaller than expected, give it a little extra time in a covered bowl in a comfortably warm place, provided the dough and machine instructions allow it. Do not put the bread maker pan in an oven unless its manual specifically permits that use.
Check the yeast
Use fresh yeast stored as directed on its package.
Check the water
Use mildly warm water rather than hot water.
Check the cycle
Confirm that you selected the correct Dough setting and that the program has completed.
Why Does the Dough Keep Shrinking Back?
Dough that springs back while stretching often needs time to relax. Gluten, the network of proteins that gives dough its structure, can make the dough elastic. A short rest makes it easier to shape without forcing it into place.
Cover the dough so its surface does not dry out, then wait another 10 to 15 minutes. Stretch it gradually from the center outward. If it still resists, rest it again instead of pulling hard enough to tear it.
Rest the dough
Give it a short covered break between shaping attempts.
Use gentle pressure
Press and stretch gradually instead of forcing the dough to its final size in one go.
Easy Ways to Change the Recipe
Once you know how the basic dough behaves in your Oster machine, you can make small changes to suit the meal. Keep the flour and liquid balance in mind when changing ingredients. Adding dry herbs is usually simple, but large amounts of cheese, seeds, or other additions can change how the dough mixes.
For a first attempt, keep the base recipe the same and change only the crust shape or toppings. That makes it easier to tell whether a new texture comes from the dough ingredients, the shaping method, or the oven.
Source: foodiepost.com
Herb pizza dough
Add a small amount of dried oregano, basil, or garlic powder to the dry ingredients. Keep the amounts modest so the dough still tastes balanced.
Whole wheat pizza dough
Replace part of the bread flour with whole wheat flour. Watch the texture during kneading and add a little water only if the dough seems too firm.
Mini pizzas
Divide the finished dough into smaller portions and shape them into rounds. Smaller pizzas can be easier to serve at family meals.
Garlic oil crust
Brush a small amount of olive oil over the baked crust and add a little garlic or dried herb seasoning after baking.
Can You Make a Dairy-Free Pizza?
The basic dough in this recipe contains no milk, butter, or cheese. That makes it suitable as a starting point for a dairy-free pizza, as long as the flour, yeast, oil, sauce, and toppings you choose also meet your needs.
Check packaged toppings and sauces if you must avoid dairy because ingredients can vary by brand. Use a dairy-free cheese if desired, and follow the package directions for its best baking results. The dough itself does not need cheese to rise or hold its shape.
Choose suitable toppings
Use vegetables, herbs, tomato sauce, and other ingredients that fit your dietary needs.
Check the labels
Packaged sauces, meat toppings, and cheese substitutes can contain ingredients you may not expect.
Can You Double the Batch?
Do not double the recipe automatically. Bread makers have specific pan and dough limits, and an oversized batch may not knead evenly or may overflow. Check the maximum flour and dough capacity in your model’s manual before increasing the ingredients.
If the machine cannot handle a double batch, make two separate batches. This takes more time but gives the kneading paddle room to work as intended. Use the same measuring method for each batch so the dough behaves consistently.
Check the manual
Confirm the maximum permitted batch size before changing the recipe.
Make separate batches
Use separate cycles when the recipe would exceed the machine’s rated capacity.
Frequently Asked Questions
Q
Can I use regular yeast in an Oster bread maker?
Yes, many pizza dough recipes can use active dry yeast or instant yeast, but the amount and method may differ. Bread machine yeast or instant yeast is convenient because it is made for direct mixing in many bread machine recipes. Check your yeast package and Oster manual before substituting, and make sure the yeast is fresh.
Q
Do I need to let the dough rise after the Dough cycle?
It depends on the cycle and the condition of the dough. Some Oster Dough cycles include a rise period, while others may leave the dough ready for additional resting. If the dough looks relaxed and has expanded, you may be able to shape it after a short rest. If it feels tight or has not risen much, cover it and give it more time in a suitable warm place.
Q
Can I use this recipe without a bread maker?
Yes. Mix the ingredients in a large bowl, knead by hand until the dough becomes smooth and elastic, then cover it and let it rise until it has expanded. The exact rise time depends on the yeast, dough temperature, and room conditions. Shape the dough and bake it using the same oven guidance.
Q
How should I store leftover pizza dough?
Place the dough in a lightly oiled, covered container and refrigerate it promptly. Use it within about one to two days for a practical short-term plan, while checking for signs of spoilage before use. For longer storage, freeze individual portions in freezer-safe packaging and thaw them in the refrigerator before shaping.
Q
Why is my homemade pizza crust hard instead of chewy?
A hard crust can result from excess flour, too little water, rough handling, or overbaking. Measure the flour carefully, add extra flour only when the dough is too wet, and give the dough time to rest before shaping. Check the pizza early during baking and remove it when the crust is cooked through and the base has browned to your liking.
✦ Wrapping Up
Conclusion
An Oster bread maker can make homemade pizza dough easier by handling much of the mixing and kneading. With bread flour, water, olive oil, sugar, salt, and yeast, you can prepare a useful base for thin crust, medium crust, or pan pizza. The key is to follow your model’s manual, measure the ingredients carefully, and check the dough texture while it mixes.
After the Dough cycle, give the dough a short rest if it resists stretching. Keep the toppings light enough for the center to cook, and use a fully preheated oven for a better crust. If the first batch is too sticky, too dry, or too tough, adjust one thing at a time rather than changing the whole recipe.
💡 Key Takeaway
Start with the listed recipe, confirm the correct ingredient order in your Oster manual, and check the dough during kneading. Once you find the texture and baking method you like, record your adjustments so your next homemade pizza is easier to repeat.